Making Mountains

To continue with our map theme, I decided I’d share a quick tutorial on how I make mountains.

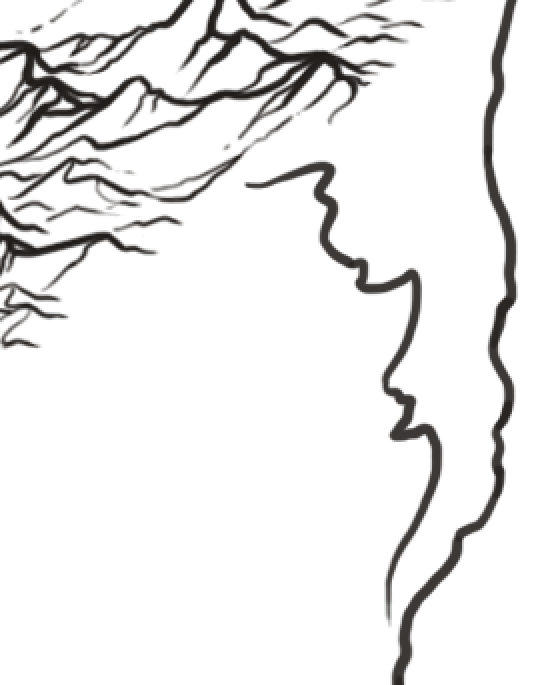
I start with a squiggle. (The line on the right is a country border.)

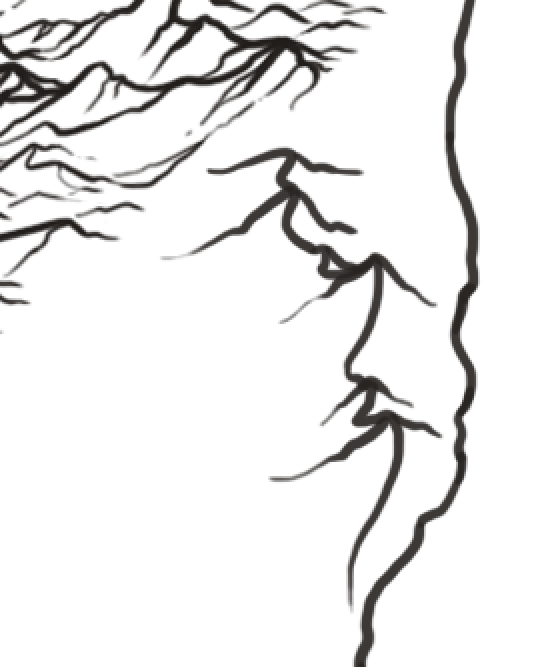
Then I add a few lines to suggest peaks.

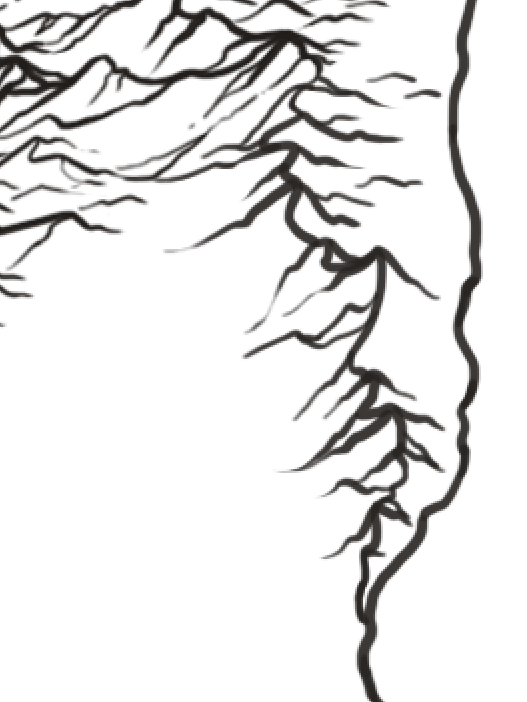
I add some more lines to give the mountains crags and depth.

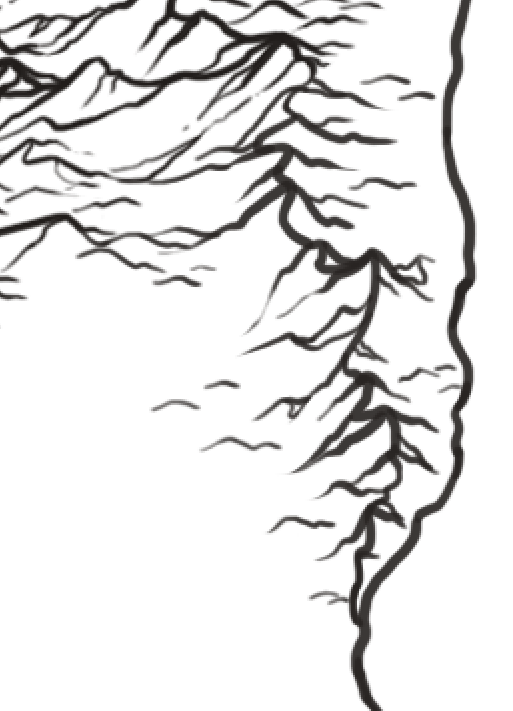
Time for more squiggles. This time I add some foothills and valleys to help blend the mountains into the surrounding land.

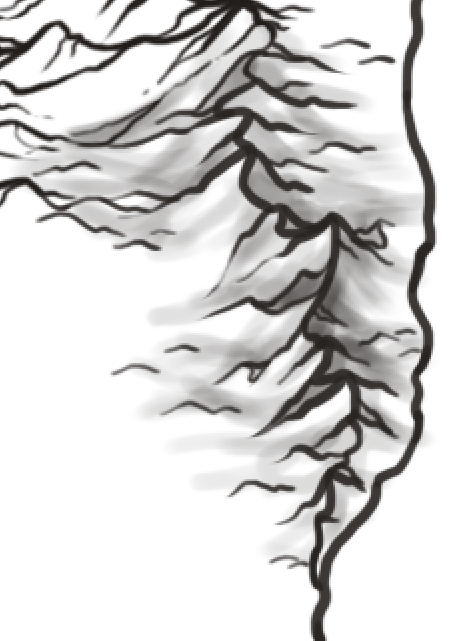
Finally, on a layer below the line work, I add some loose shading. Generally, I’ll add this in sepia, but for the purposes of this tutorial, I just used grey. You can add a few highlights if you like, especially if the mountains are snowy, but I try to keep the “painting” aspect of the mountains to a minimum to help them blend into the larger map.

The image below is from a different map (I haven’t finished the above yet), but you can get an idea of how the finished mountains look. Here, I’ve layered a scanned watercolor texture into the background and added trees, rivers, etc.

Let me know if there are other tutorials like this that you’d like to see in future posts.

The Journey of a Map

Mapmaking is not only a practical pursuit for me as a writer, it’s also meditative for me as an illustrator.

All of the maps for my books begin as very rough sketches in notebooks. The below map is for my fantasy duology, Flowers of Poison. The notebook for these books is a lovely handmade book: leather bound with handmade paper, which made for fun aesthetics, but horrible sketching. I lovingly refer to my book maps as my “Happy Mappy”s as generally, they’re my reward for revising and editing.

I’ve worked on these books on and off for 10 years, and in that time, have started a few maps that went nowhere, such as below.

As I worked on revising the latest drafts, however, I decided it was high time I made a proper—digital—map. Creating the map digitally has several advantages, chief among them being the ability to edit. Over the last 10 years, the books have undergone enormous changes, which meant that the map has changed too. I needed to be able to continue tweaking the map as the books grew and evolved. This is one great advantage of digital maps over traditional. For this map, I used mostly Adobe Photoshop with Adobe Illustrator for certain elements.

After creating a background texture with watercolors, I scanned it and set it as the base layer in the PS file. Then, I began the long process of drawing the major map elements: borders, mountains, forests, and water. And yes, each of those trees is individually drawn: coniferous closer to the mountains and in the North, deciduous farther from the mountains and toward the South. In the future, I’ll likely create brushes or clone stamps for the trees, but as the forests are an integral part of the books, I wanted to take time to think deeply about them: how and where they grew, how they were cut back, how the forests regrew and adapted after disasters, etc..

I used a deep sepia for the lines, as it would blend better with the background texture and provide more of an antiqued feel, rather than a stark black.

One of my favorite parts of mapmaking is the detail I’m able to hide in the ornament. For this map, I knew that I wanted the compass rose to feature a falcon and a hawk: the main characters’ familiars. Initially, I thought to put them on an art nouveau style circle, but ended up deciding to go with a simpler knotwork frame, to match the city labels. For me, it’s helpful to do the rough sketches in multiple colors to help distinguish the overlapping elements.

At this point, I also sketched tiny icons to give a sense of each city and village. One of my favorite fantasy cartographers, Misty Beee, makes gorgeous city labels, and I shamelessly stole her idea. I added simple values to help further define my doodly buildings.

Using sepia tones on a separate layer, I painted loose shading on the mountains to give them more depth and dimension and to help make sense of those masses of squiggly lines (more on this in the next post). I also added simple shading to the compass rose to further define it.

Frames are in no way necessary for maps, but as an illustrator, I love the chance to add more narrative details. I created the framework, flowing branches, and roots in Illustrator, as this gave me an easy way to get clean symmetrical lines. I also created the town labels, name scrolls, radiating compass lines, and compass rose wreath in Illustrator to achieve the same clean line work.

Then I began the fun process of filling the frame in what was certainly not procrastination from editing the actual books.

The red-shouldered hawk and peregrine falcon from the compass rose are repeated here, along with two stylized perfume bottles. The two main characters in the books are both perfumers, so I wanted to illustrate their signature scents somehow.

The challenge of illustrating perfume is immense: how to capture in pictures something so fleeting and ethereal? In the end, I decided to create art nouveau knotwork of each perfume’s main notes/ingredients, with bottles designed to express each character’s personality. On the left is a forest fougere with a bottle decorated with hawks, a tree, and curling seeds. On the right is a perfume of poison florals with a bottle composed of sweeping daturas and a dagger applicator.

One of the last things I did to add further value to the map, and thus help it not be so flat, was to add sheer layers of color (i.e. paint in the areas with a hard opaque brush, then set the layer opacity to somewhere between 20-65%). I used white overlays over the land masses and datura to bring them forward, and sepia overlays over the water and frame elements to give contrast to the image overall.

I happened to finish my Happy Mappy the same day I finished revisions for the duology. After which I took a long, well deserved nap.

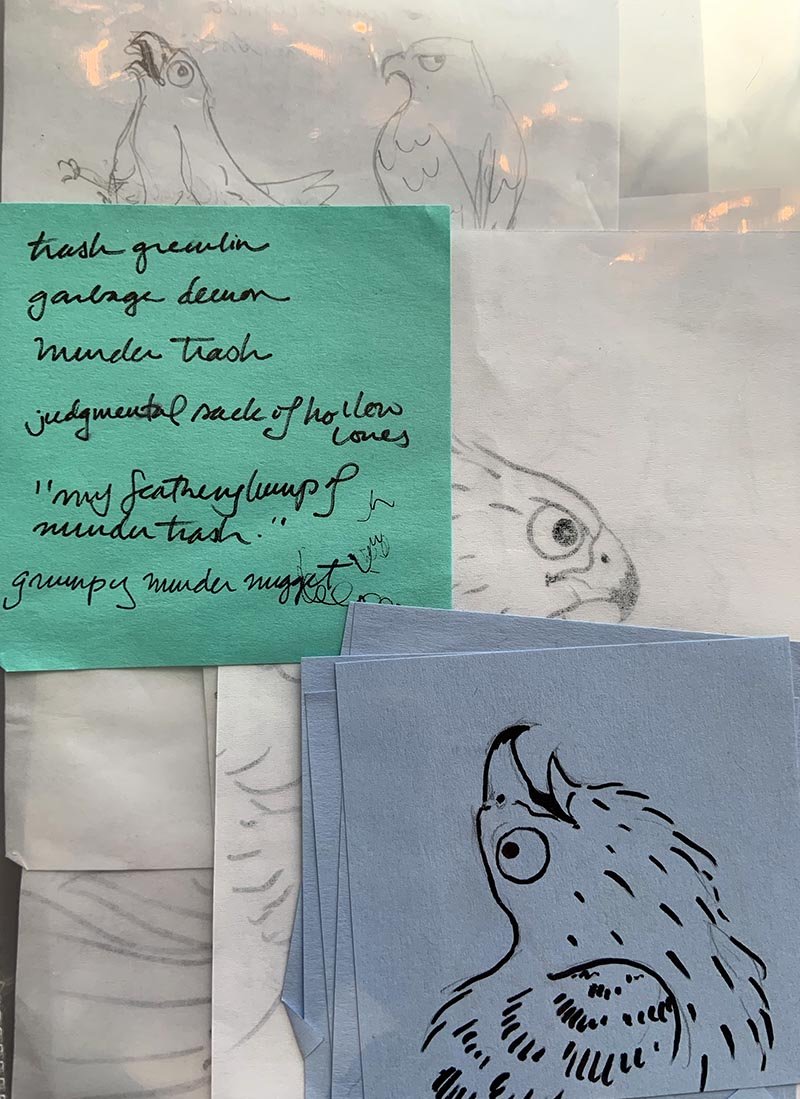
To reward you for reading all the way to the end, you get bonus Helen (sassy hawk) doodles.

The Story of a Map

For me, fantasy cartography is a way of delving deeper into story. As both a writer and a map-maker, I find creating maps a useful tool for me as I explore story and the places in which it dwells. There is, of course, the practical use of a map: the tracking of characters and the places to which they travel (the surface story, if you will, the dotted squiggly lines of quest and journey), but maps also contain a mythology unto themselves. A map is a visual representation of conflicts and tensions eons old: that of history, of climate, of the land itself. In a recent talk about her new book, Atlas of the Heart, Brené Brown said:

“The story is in the layers of the map.”

Map-making, for me, requires if not an understanding of, at least a curiosity about those layered stories. My curiosity extends far beyond the historical tales of conquest and cultivation (the historical overlay), to the stories of “why?” that underlie them. Why are countries shaped the way they are? Why do coniferous forests grow here, but not over there? Why are cities where they are?

Map-making can also be a delightful form of procrastination. An excuse of “sorry, I can’t tackle those plot holes yet, I’ve got mountains to create. Mountains!”. I personally get far too caught up in the illustrative and decorative map elements (more on that later), and often use it as a way to avoid, you know, writing the actual book to which the map is mere accompaniment. Though perhaps one day I’ll make a book of nothing but maps: an atlas of onionskin pages with maps of forest mycorrhizae, of water patterns, of air currents all overlaying one another. But I digress. This is my meditation on map-making. In the next post, I’ll create more of a practical guide to creating and illustrating fantasy maps.

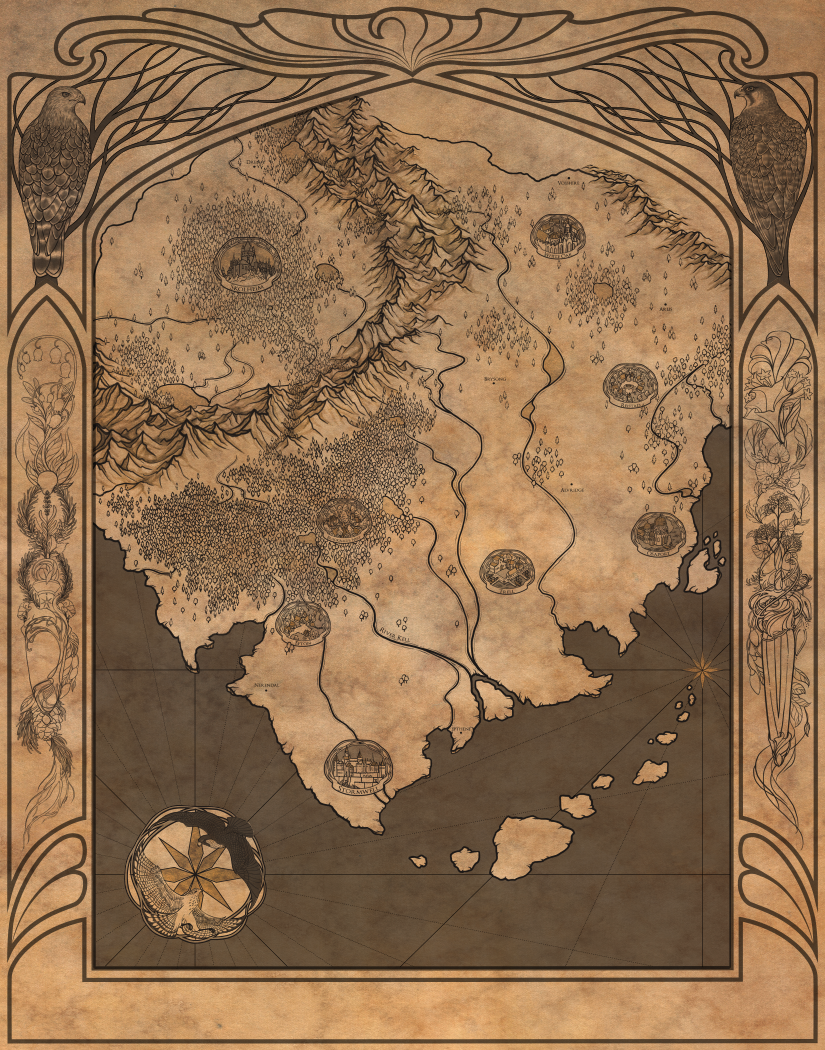
The map for my fantasy duology, Spectra Datura and Petrichorum.

The Surface Story

Most of my maps begin here. This is the practical information as relates to the main narrative arc of the book. Where do the characters come from? Where do they go? What distances and obstacles lie in their way?

When planning out a new book, I’ll make quick sketches of the map so I know the basics of the world: what kingdoms are where, their general topography, major cities (especially as they pertain to the narrative). Sometimes I’ll also include rough sketches of cities or floor plans of a house or building. Any space that a character spends a significant amount of time in is worthy of a map. Mostly because it helps my poor little pretzel brain.

The Historical Overlay

Borders, inevitably, are the stories of humans. It is humbling to realize when gazing at a map, any map, that people have fought and died over every curve and corner of every border, ever. What tragedy lies in those lines, what grief?

Borders are often the scars left over from war, conquest, and colonization. They are gouged out by history, yet are still changeable. There’s a certain amount of fear, but also hope, in the impermanence of borders. In the realization that they are abstract constructs defended by armed guards. Maps never stay the same for long.

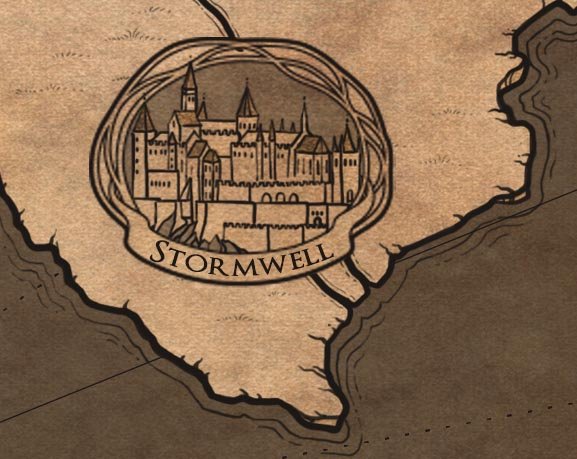
This is also the layer of the map where countries and cities are refined and their relationships to one another expressed through borders, ports, even rivers and rail lines. These are lines of communication and trade, even isolation. So much can be expressed through simple lines and the positioning of cities on the map. For example, in the above excerpt of the city of Stormwell (the capital of Rennan), I positioned it on the coast and in a river delta to show its power as a port. This then serves to reinforce Rennan’s position as an economic and industrial power, especially as opposed to Venland, which is landlocked and surrounded by mountains, making trade difficult.

The Saga of the Land

I am fascinated by stores of land and water. Why do those fjords have that shape? Were they carved by glaciers? Where are the glaciers now? What lies beneath them? Why do deciduous forests grow there? Is rain funneled to them from the mountains? Are they protected from winds by the hills? Why are the cities where they are? Do warm currents make those islands rich with fish, easy for trading ships to pass through?

Once I sink into the stories of the land, I am apt to remain there for days on end. Perhaps weeks. Which is good because, at least for me, this is the most time-consuming and labor-intensive part of creating a map. This is when I draw the endless mountains, rivers, forests, deserts, and coastlines that constitute the body of the map.

In the map excerpt above, I spent a long time thinking about what kinds of trees would grow in what parts of the forest. So more coniferous trees grow to the North and West, toward the mountains, while deciduous trees constitute the heart of the forest and increase in volume as the forest grows into moors and river plains to the South and East. As this is an important location in both books, I wanted to spend time considering the stories of the forest itself: how it grew, why it was cut back, the geography that has helped it survive. (And yes, I drew every single one of those trees by hand. Madness, I know.)

This is then the time when I contemplate the sagas underlying the book’s surface story. The forces of land, water, climate, weather shaped the cultures of each country, and thus, each character. So many of my childhood memories are inextricably tied with the forests, lakes, rivers where I grew up. Those forests shaped me as my family did. They are, in a sense, my family too. Environmentalism underlies much of the fantasy I write, so for me, these stories are as important as the human stories a map tells (the stories of cities, economies, politics, and people).

The Symbolism of Decoration

One of my favorite parts of creating a map is illustrating decorative elements for it: a border, compass rose, city labels, and of course, the occasional sea monster. I love being able to hide symbols that relate to the book in the tangle of borders and compass roses.

For instance, when I created the map for my fantasy duology, Spectra Datura and Petrichorum, I drew two “portraits” of the main characters, both of whom are perfumers, in the borders in the form of their signature scents. I decided to not only illustrate the main notes of each perfume, but to also design symbolic perfume bottles for both of them (one is decorated with hawks and a tree, the other with a datura and dagger).

Similarly, I included more literal portraits of their familiars: a red-shouldered hawk and a peregrine falcon, who act as sigils for the two main characters.

The hawk and the falcon.

The hawk and the falcon can also be seen in the compass rose. One soars gracefully above, while the other erupts from below in chase, a nod to the main narrative arc of the book.

Fantasy cartography can be a wonderful meditation on the layers of a story, and the places from which they grow. It’s an opportunity to think deeply and consider they “why” and the “how” of place and how those places influence the underlying structures of culture, politics, economics, etc. Besides that, maps are fun to make. Even if you’re not an illustrator, give it a try! You never know what buried treasure you may find.

Bonus: Music to Make Maps To

Below are links to albums on Spotify that I enjoy listening to while I draw maps. All are classical/instrumental and help me create a good meditative mood for map-making.

Ludovico Einaudi’s Seven Days Walking :

https://open.spotify.com/album/5Otajf16kZ0zkVZWhu7LtO

George Winston’s December :

https://open.spotify.com/album/4aZ3oEhEWIW4KmgbimsvFt

Ólafur Arnalds’s Island Songs:

https://open.spotify.com/album/1LvZUmULkYj2c3oxIZhbkX


Sentence Gardening

As summer blooms, so too does my urge to garden, both with dirt and plants and also with words. While I’ve talked a good bit in the past about “novel gardening” and how it applies to big picture edits, I haven’t discussed its counterpart of line editing, which I think of as curating a small flower bed. Many people speak about flowery language as a negative, but I believe with a bit of cultivation and judicious weeding, even the most flowery sentences can be at once beautiful and powerful.

dragonfly_sm.jpg

This is by no means prescriptive advice. Rather, this is what’s helpful to me as I write. Your process may look completely different, and that’s wonderful. If we all wrote or gardened the same way, we would soon grow bored of the neat rows of flowers and manicured prose.

The Sentence as a Flower Bed

Words, like flowers, can be powerful, beautiful, healing, and sometimes even dangerous. Some are small and weedy (a, in, but, of), some are striking and sublime (abnegation, ethereal, susurration), still others are practical and useful (and, the, so, because). Oh, if only we could smell words. But we can smell books, which are heady and intoxicating in their own way (yes, I’m one of those book-smelling weirdos). That will have to content us for now. In any case, a sentence needs all types of words, much as a garden needs all types of plants. It would be overpowering to walk into a garden of nothing but corpse flowers (the stench!), or birds of paradise (the drama!), or even dandelions (the allergies!). In the same way, sentences work best with a harmonious blend of words.

bee_sm.jpg

As much as I love a meadow overflowing with wildflowers, I also believe that in the garden of prose, there is a time and a place for such abundance. My basic approach to sentence gardening is that the prose should reflect the character’s internal landscape. If they are thoughtful and languorous, then by all means, ramble through the wildflowers and stop to smell some lovely words or turns of phrase along the way. If the character is experiencing fear, anger, or fast-paced action, keep their landscape stark: a single blood-red rose, a piece of twisted driftwood alone on the rocks, a jut of sharp grasses cutting across the sky.

Strong Verbs

My single best piece of advice for sentence gardening is to use strong and active verbs. Let the entire flowerbed revolve around them. A strong verb is a centifolia rose, an orchid, a black dahlia (the flower kind, not the murder kind): the captivating heart of your sentence. Avoid passive verbs wherever possible (am, is, are, was, were, etc.) and replace them with active verbs. Strong verbs can characterize a place or character as much as blocks of description. For instance, if your character is a gardener, try to use plant-based verbs: ideas root, thoughts blossom, seed doubts, plant information, prune expectations, etc. Match the rest of the language in the sentence/paragraph to that same theme. Let’s try a few examples, mm?

Original sentence: Sara was upset that Sam didn’t invite her to the party.

Better: Disappointment grew in Sara’s heart as she looked at her blank screen. Still no invitation from Sam.

Best: Briars twisted through Sara’s rib cage as she stared at her blank screen, biting deeper as “read” appeared next to her last message. Sam’s party would be in full-bloom by now.

Yes, the sentence gets longer with each revision, but we also get deeper into Sara’s emotions and therefore feel more connected to her. While the first two sentences tell us, directly and indirectly, what Sara is feeling, the last sentence shows us and lets us feel it for ourselves. We feel the contrast between Sara’s briars and the lush blooms of the party, which helps us feel Sara’s isolation and disappointment.

Weeding Your Sentences

I keep a list on my desk of words to avoid in writing. A large portion of this list comes courtesy of Dreyer’s English by Benjamin Dreyer, a delightful romp through the world of grammar and usage. Additions to this list have been made by my brother, a brilliant professor of rhetoric and composition. These words can almost always be weeded, or rendered unnecessary with a stronger verb or tighter sentence structure.

  • very

  • rather

  • really

  • quite

  • in fact

  • just

  • so

  • pretty

  • of course

  • surely

  • that said

  • actually


Adverbs, especially -ly adverbs (i.e. dreamily, quickly, loudly, etc.) can almost always be added to this list of weeds to pull. In most cases, replacing an adverb + verb combo with a stronger, more specific verb can render the adverb unnecessary. The exception being if the adverb communicates necessary/relevant information that cannot be fixed with a stronger verb.
For example:
Original: The dog ran away quickly from the mean cat.
Better: The dog sped away from the mean cat.
Best: The dog fled.

Sentence Ikebana

During high school, I lived as a foreign exchange student in Japan. While I was there, I had the honor of taking a class with an ikebana master. Ikebana is the art of flower arranging, but it is also a meditation on balance and restraint. Simple, well-crafted sentences can speak volumes. For example:

Original: It stormed outside.

Better: A storm raged outside.

Best: The sky howled.

In this example, with each revision the emotion of the sentence becomes clearer and therefore stronger. By the last sentence, there can be no doubt about the emotional impact of the sentence.

Of course, there is a time and a place for such piercing sentences. If, for instance, the characters are celebrating a romantic picnic when it begins to storm, the move from tender happiness to raging storm may be a bit jolting. It could, however, be used to signify an underlying conflict, subtext, or rising tension between the picnicking lovers. Always use emotion in service of the story: whether building tension, elucidating underlying questions, or deepening a character.

butterfly_sm.jpg

The Senses of the Sentence

One of my favorite parts of walking through a garden is smelling and feeling it. I love running my hands through rosemary, feeling the thin leaves tickle my palms, hearing the gentle whisper of the movement, tasting the bitter note of the fresh leaves, and smelling the herbaceous scent on my skin afterwards. Similarly, I enjoy engaging all my senses while reading: rolling words over my tongue, hearing them spoken aloud, smelling the memories they provoke, tasting the smooth edge of the structure. This is not to say that every sentence should speak to every sense. Rather, create sentences that can fully envelope your reader, sinking them into the world of your words.

Not sure how to make a sensory garden of your sentences? Here are a few suggestions:

-Use words with sounds that mimic the mood/tone of the sentence. For instance, if describing a sleepy, dreamlike state use words with soft cozy sounds: cloud, shush, woolen, sonorous, plush, velvety, moon.

-Use a literal sense, such as smell, to elevate the atmosphere of your prose: Cool spring rain soaked the moss carpet, its scent flooding the room.

-Use punctuation to prick tongues into pausing. For example: The cat, waiting, watched the door.

-Create sentences you can swim into. Imagine lowering yourself into the words and gliding out into the space they create. For example: Rivers flow through wooded hollows, floating toward the sea.
Can’t you feel the cool water on your skin? Smell the scent of sunlight and river water?

-Create a visual landscape with your words. For instance, if you’re conjuring a vacant, overgrown lot use tall, weedy words: Thistles and thorns grabbed at my trousers, ivy tangling my every step.

Beware of Weird Invasive Tenses

English has some weird grammar. As a polyglot, I say this with great certainty and experience. As persnickety as languages like German or Japanese can be, at least they have well-ordered, logical grammar.

As such, we who write in English must beware the weird grammar that lurks in the wilds and can become invasive in our prose gardens. Here’s an example that I pulled from ESL Buzz :

passivevoice.jpg

Unless you have a specific reason for doing so, stick with active simple tenses as much as possible. Personally, I have a bad habit of writing in perfect tense (i.e. adding has/had/have to the verb). Thankfully this is an easy thing to correct in revision (I had made a cake—>I baked a cake). Nine times out of ten, you can correct these bits of awkward phrasing by simply replacing the verb with a stronger, more specific verb (in my example: changing “had made” to “baked”).

The best advice I can give for correcting awkward bits of grammar (even if technically correct) is to read the sentence out loud. Actually, this is some of my best writing advice period.

Read your writing out loud.

What does a crab have to do with sentence gardening?  Absolutely nothing.  He’s just cute.

What does a crab have to do with sentence gardening? Absolutely nothing. He’s just cute.

I like to read to my dog (she’s a much kinder and more attentive audience than my cat), but you could read to a friend, a tree, a family member, or even an empty room. The important thing is to say your word-gardens out loud. This will help streamline your prose and keep it in a consistent, flowing voice.

Fan Art

I have always had a love/hate relationship with fan art. In one way, I enjoy celebrating my favorite movies/books/TV shows by making art inspired by them (you know I can never resist a good Frozen or Song of the Sea doodle). In another respect, I feel like fan art is unproductive for me. After all, I could be spending that time working on my own projects, rather than just indulging in someone else’s fantasy. Recently, I’ve been thinking of my book/illustration work as my own sort of fan art: fan art that I create based on my ideas and creations. A book, after all, could be considered fanfic that one person makes of the ideas swimming around in their head.

joshua_desk.jpg

Which is not to say that my work is so amazing that it deserves fan art. It’s not. Certainly not to me, who works on each book for years. Years. Which can sometimes lead me to feel a bit stuck. Trapped even. So I thought, if I’m here anyway, why not enjoy the view? Celebrate it even? It’s an interesting way to approach working on my books. It engenders a mentality of cheering myself on, getting excited about the worlds and characters I create, and letting that enthusiasm spill into the work itself.

Thinking of the work as “fan art” or “fanfic” also necessitates that I be a fan of my own work. Which is far easier said than done for me. Too often, I am critical and judgmental of my work, rarely taking time to step back and just enjoy it, much less say “wow, this took a lot of hard work, I’m proud of this.” Just typing those words makes me laugh. In some ways, letting myself be a fan of my own work is an act of faith. A symbol of belief. A belief I so rarely feel. The belief that this is not all complete and utter garbage, that the book is worth finishing, that there is something magical and fantastic in there worth celebrating. Even if it’s a little thing. Oftentimes, I have to find a single idea that I like. Just one. I can then hold that idea up as proof, to tell myself “see, this is worth all your time and hard work.” A lot of writing (and painting), at least for me, is telling myself that it is worth it. That it is not all worthless bosh. And neither am I. I know, I have frighteningly low self-esteem, especially when it comes to my work. But that’s one thing that always pushes me to be better. To work harder. Practice more.

But that mentality isn’t healthy. At the very least, it’s only effective in small doses. Too much negativity and self-chastisement and I get bogged down. And that, more than anything, is what causes my creative blockages. My own mindset. The good news, however, is that mindsets can be changed. It might take time and practice, but you’ll get there. Choosing to treat yourself gently and with kindness can be difficult at first. I still struggle with it daily. That’s why oftentimes, it’s easier to start with one thought. Say, “I get to write fanfic of these interesting characters in my head!” instead of “I have to make myself write at least one scene today,” or what have you. If I can see my creative work as an enjoyable opportunity, rather than a difficult obligation, or a task I’ll never measure up to, I’m much more likely to produce better work. It’s the whole carrot vs. stick scenario. And we all know that carrots are much healthier than sticks. Unless perhaps you’re a beaver.

beforetea_sm.jpg

Be nice to yourself. You deserve it. As does your imagination. Give your own creative ideas just as much value and power as you give to your favorite books/movies/TV shows/etc. if not more. They deserve it. After all, your favorite book started out as just an idea in someone’s head. Same with every movie, TV show, comic, song, etc. They were all just ideas once, that someone believed in and honored with their hard work and time.

You are capable of incredible things. And I say that in full knowledge of the literal meaning of the word. Something that you can’t believe. Not yet, anyway. You are stronger than you think, more creative than you let yourself believe, and capable of more than you’ve ever imagined.

I believe in you. What will you create?

Hidden Inspiration

I am a huntress of rare grace. A pursuant of everyday beauty. A seeker of hidden inspiration. Take me to the beach, and I’ll walk the shore for hours, looking for pretty seashells. In the forest, I’m like to pick up golden acorns and lacy leaves, stowing them in my coat pockets for later. Even in rest stop meadows, I’ll gather honey-scented clovers to tie into chains and crowns, leaving them for passersby. Beauty and inspiration hide everywhere, I’ve found. And what joy is the hunt!

desk.jpg

Online image resources like Google Images or Pinterest can seem far removed from a forest or shell-strewn beach at first glance. Yet they also hide great treasures, provided you’re willing to hunt for them. How fortunate we artists and creatives are, to live in an age of information and online image databases.

My first boss, a kind mountain man and great nature painter, had filing cabinets full of images and photos he’d cut out of magazines, nature guides, and books over the years. So if he asked me to paint a diamondback rattlesnake (I painted museum casts all throughout high school), I had to dive into the cabinets, wading through folder after folder in order to cull just a few pertinent reference images. One day I dug into the filing cabinets to find reference pictures of a certain type of tree frog, only to discover an enchanting photo of a hawk (thus fueling a years-long obsession with raptors). Now, all I have to do is type my query into Google or Pinterest. Some say that we have lost the magic of accidental discoveries all for the sake of convenience. I would argue the contrary.

Silly though it may seem, I generally start an illustration (or even piece of writing) with a cursory image search, usually both on Google Images and Pinterest. Not only does this reveal what’s already out there, but shows what’s been done before, and how. Sites like Pinterest can also be useful for observing current trends, a feature I made great use of when I worked in commercial fabric design. But I distrust trends. A) because they won’t last (especially in areas like publishing), so that by the time you’ve “caught up” and tailored your style to match current fashions, the trends will have moved on and more importantly because B) your work and style should be your own, made for your own pleasure and edification, not to please an invisible and ever-changing market. It seems a simple thing to say, yet it took me years to truly learn. That said, I do like to see how others across the world have interpreted a concept. I like to keep my searches simple and broad: a few key words (such as “summer twilight,” “Arctic forest,” or “yew tree”), which I can then refine further if need should arise. Google Images and Pinterest also allow you to search or browse through related images, a feature I find myself using frequently.

Often I find treasures buried in the related images (though sometimes four or five tiers down). Maybe my keywords weren’t specific enough, or perhaps searching in English limited the results (I do search in other languages from time to time, such as when doing research for my picture book set in Arctic Norway, I’ll usually search in Norwegian). Of course, as anyone who has used Pinterest (or similar sites) before knows, there is always the danger of falling down the rabbit hole. I admit to falling into this trap numerous times (especially when researching book things or reference images, since I can tell myself I’m “doing work” even though I’m not being productive in the slightest). And sometimes those journeys into the Deep Dark Pinning Depths (which I imagine to look something like the depths of Moria) do result in a rare gem that sparks inspiration, but more often than not, I find that it’s yet another disguise for procrastination.

I also enjoy watching documentaries while I paint or listening to TED talks. Netflix has a wonderful selection of science and nature documentaries that often give me new ideas or perspectives for the project at hand. Similarly, I’ve found that if I’m actively engaging different parts of my brain while I paint (even if it’s trying to keep up with a TED talk on neuroscience), it helps deepen my experience of painting and view the work from new internal angles. Or at least bring different ideas and perspectives into the work.

forestoffallenstars.jpg

Yet my greatest source of inspiration is always nature itself. A walk in the woods is my creative panacea. Every time, I find it leaves me refreshed and renewed, and even if it’s hasn’t left me with a jolt of inspiration, it has created a calm and welcoming environment, so that when inspiration visits later, it will feel so at home it might stay a while.

Inspiration is hiding all around you. You have but to open yourself to the presence of wonder, the possibility of beauty in all things.

Little Village Process

As my series of little village paintings comes to an end, I thought I’d take this opportunity to give you a peek into my process for one of them. And as it’s a rather rainy day today (which I adore), the rainy mushroom village seemed a perfect choice.

Since my health limits me from getting out as much as I’d like (especially to hike), I’ve enjoyed painting these little villages as a way to explore all the pretty and magical natural places I’d love to visit. As a child, I always played outside, making little houses and villages for my small animal toys, and it was lovely reliving those memories as I painted. In a way, I’m still playing those same imaginative games, only now with watercolors!

These are small and easy paintings to undertake, done with relatively simple techniques, so feel free to use this as a guide and paint your own little village! I’d love to see where your imagination takes you.


rv1.jpg

Step 1: Sketch

First, I trace a 6 inch circle using a candle lid to trace (bowls and baking canisters work well too). I like working in circles, as it’s a more organic and peaceful shape to me, but you can use squares, diamonds, or any other shape you like!

I’m quite a messy sketcher (this is actually rather neat for me), since in painting, the sketch is usually quickly obscured. But since this will be inked, I wanted to give myself a few more guides to follow.

rv2.jpg

Step 2: Ink

Using a sepia .005 pen (I like Sakura Pigma Micron pens), I inked the whole scene, down to the teeny tiniest details. I like using sepia ink because it means the lines aren’t quite as harsh as with black, but you still get good definition.

Generally I don’t like inking paintings, as it’s rather like cheating in my mind, since the ink defines the edges for you, rather than forcing you to clarify them through light and shadow. But, inking allows me to keep these paintings relatively quick and easy, since I don’t need to render every aspect with paint alone. But that’s just my own personal preference and style!

v3.jpg

Step 3: Base Washes

This is where the fun starts! Using watercolors, I painted a gradient wash over the whole scene, starting with an indigo/marine blue at the top and gradually shifting to an undersea green/subdued bluish green at the bottom. I like starting with some sort of overall gradient (oftentimes I’ll put the lighter/warmer color at the center, and the darker/cooler color at the edges, though I didn’t here), as it helps unify the piece from the very beginning, and sets the visual mood.

While the wash was still wet, I dabbed it with a damp sea sponge (a crumpled up paper towel will work in a pinch) for a nice bit of texture. This is an optional step, but I like the overall effect it gives.

Then, dampening a small sea sponge (a damp bit of paper towel will work too), I lifted the color from all my light sources, in this case, the windows and glowy mushrooms. I also lifted the color from the little animals with umbrellas, as I wanted them to be brighter/more in focus.

Next, I let the painting dry for an hour or two (while I watched some Great British Baking Show, made some more tea, and took a nap). When using such heavy washes, it’s important to let the painting dry completely between stages to keep your colors from bleeding together and becoming muddy.

v5.jpg

Step 4: Light Washes

After the painting was completely dry, I went back in to start adding color to my light sources. Generally, I like warm light in paintings, as it looks glowier and cozier (and thus, more visually inviting), but bioluminescent mushrooms tend to be cooler and more aqua in color, so I took my cue from nature.

I like keeping the light washes rather wide and messy at this stage, as it helps give the impression of the light glowing, as it will infuse into the colors around it (such as the yellow window lights lightening the greenish brown of the tree trunks in the next stage). Painting light is a fun puzzle: figuring out where the light would fall, what color it would be, and what it might reflect off of.

In this painting, I kept the light washes quite simple, but often I enjoy adding many colors to my light sources (like a circular gradient, where the inside is light yellow/white, moving to gold/orange, and finally to a soft rose madder on the outer edges). But since I wanted this village to be a bit rainy and dark, and because there are so many light sources, I chose to keep the light washes simple.

v6.jpg

Step 5: Darker Layers and Perspective

Generally, things closer to the foreground look darker, while things farther away appear lighter. This is an easy way to communicate perspective in your painting and thus break up the visual plane. You want your viewer to be able to wander through your painting, getting lost in its world, and this is a key way to achieve that. In this case, it meant painting my foreground trees a darker greenish brown than the trees in the distance, which are only slightly lighter than the background.

I also tried to lighten the bark around the windows a bit, adding more greenish-yellow to the mixture to communicate the glowing lights.

This is also when I started adding greenish blobs of moss to the trees to further that “rainy day” feel. The moss closest to the windows is more of a yellow-green, while the moss further away from the light is more of a bluish or turquoise-green. Mostly, I just really like moss.

rainy_mushroom_village.jpg

Step 6: Details and Finishing Touches

For me, this is the most fun part. This is when I finished adding all the colors of the scene: the green of the grass, the grey-violet cobblestones, the brown mushrooms, and the warm brown doors with indigo eaves. The little animals were one of the last things I painted, as I wanted their colors to stand out bright and vivid (without the risk of getting muddied during previous washes). Also, by now I knew what colors they need to wear in order to best stand out, while still remaining a homogeneous part of the painting.

Before I added the raindrops, I decided to re-ink the main trees and animals with my same sepia pen. Using so many dark/heavy washes had faded my original ink lines, and I wanted a bit more definition. But, I only re-inked the outlines of the trees, windows, etc. and left the inked texture of the tree bark and all the little details alone, as I wanted them to blend in a bit more.

Finally, the last step for this painting was using opaque white gouache to paint the rain drops and little splashes. When it comes to these sorts of finishing details, especially done in white/bright gouache (which tends to stain if you try and scrub it off), I’ve found that less is more. I also used a watered down white gouache to add some reflections to the cobblestones, making them look wet and slippery. Then I dotted a bit of white gouache at the center of each light source to make it look even brighter and more glowy.

And that’s it, you’re done! After I scanned the image, I cleaned it up in Photoshop a bit (making the circle crisp and clean and adjusting the colors to match the original), but that’s a completely optional step.

The most important thing to remember with these little paintings is to have fun and enjoy the process. Let yourself play! Because play, I believe, is one of the best ways to grow (especially as an artist).


Novel Gardening Part II

Since my last post about tending to the garden of the novel, I have been doing a great deal more novel gardening (i.e. revising and rewriting), some actual gardening, and thinking a great deal about ways to cultivate growth and positive change in the wild spaces of writing.

forest_garden.jpg


In the spring, my sweet husband made me two small herb gardens in old metal tubs, since we live in a rented townhouse and thus can’t plant an actual garden just yet. I’ve already harvested herbs from them several times, hanging the fragrant bundles in my kitchen to dry, and I’m already looking forward to cooking with them all winter long. It then occurred to me that sometimes I need to trim back parts of my novel and let the bundles rest for a bit, so that I can use them later on. Not only does this pare a scene down to its essentials and keep it from interfering with its neighbors, sometimes the extra bits can be put aside for later use. I enjoy using Scrivener when working on novels, partly because it makes organization so easy, not only for the novel itself, but also for all the research, notes, etc. that go with it. A bit like a garden shed nestled in a back corner.


I am not, by nature, an organized person. While this drives Daniel crazy, I quite enjoy running on chaos most of the time. However, I’m working hard to become more organized when it comes to my novels, as a bit of organization and planning at the beginning can mean far less revising and rewriting later on (as I’ve learned the hard way). In tidying my novel “shed” (all the behind the scenes work), I’ve created a few different bins into which to sort things I’ve either cut or dug up from my books. For each, I created a separate folder in my Scrivener project, as well as a few notebooks in which to jot ideas outside of the garden proper. This is by no means a definitive system (it’s hardly a system at all), simply what I’ve found works best for me. For this season anyway.


Things to Transplant

Often when I’m revising a scene, I’ll cut large chunks of text that don’t work, but that I still like. So I’ll put them in a separate pot in the greenhouse for a while, and see if I can find a place for them later in the book, or in a different project entirely. Sometimes I do, sometimes I don’t. Plants don’t always survive in pots, just as fragments don’t always work outside of that particular scene. But that’s okay too. A healthy garden needs compost to! Which leads me to my next bin…

Compost Bin

Some days we are blessed to write page after page of brilliant stuff. The flowers bloom, the sun shines, and the birds all break out in glorious song. But more often than not, at least for me, when I sit down to work on a book, it feels like I’m slogging out into the garden in heavy rain, my wellies sticking in the mud, and nothing is growing. So I write the weeds, then put them in my compost bin. This can be a depressing process, especially if it goes on for weeks and months, but it’s a necessary one.

So it cheered me somewhat to read a recent keynote speech given by author Lynda Mullaby Hunt at the SCBWI LA conference where she said:

“I wrote for hours. For days, months. Many, many moths. And I knew it was not good stuff. And so I just kept writing crap. The gardener inside reminded me that crap makes good things grow. So, I just kept going.”

I believe in writing every day. Even if that means writing weeding compost stuff. Because the compost shows that I’ve been working through it. I choose to believe that nothing is wasted. I choose to see my compost bin as proof that I’m willing to put in the hard work day after day, and to really tackle the questions and problems of the book in a deep and meaningful way.


For the last six years, I’ve worked on and off on a YA fantasy trilogy. I was 75% of the way through the second book when I realized none of it was working. The books and characters had changed so much through a half-dozen revisions that I no longer recognized them. The plot felt disconnected, the themes buried under half-hearted attempts to make the books more “commercial,” and my inspiration had long gone stale. So, I threw the books into the compost bin and decided to start over, combining the ideas of both books into one new novel. Was it an easy decision? Not in the slightest. Did it hurt? You betcha. But as soon as I made the decision to start over, with a freshly tilled garden plot (pun intended), I found inspiration rushing back to me, begging to be planted. The two composted books are providing excellent fertilizer for the new novel; they’re helping nurture my seedling ideas and questions, so that they can grow into a garden so full of life it one day will become a forest of its own.

Staying Open

In the midst of all this, I have realized once again the necessity of staying open. Open to new ideas, directions, and inspirations. Open to seeing what you once thought of as a weed as a beautiful flower. Open to letting yourself try new things and experimenting in your garden. Once I let myself be open to the possibility of starting over, my inspiration began to come back to life.

I believe that openness is a choice. It can start with a small choice to try rewriting a scene from another character’s perspective. Or to play around with a new setting and see how it influences your characters and their decisions. Openness is a sum of small choices. Such as my choice to view starting over as an opportunity to have fun and start something wonderful growing, rather than just slashing and burning my old book gardens and letting that negativity and resentment fester.

Seedlings and Clippings

Of course, I’m still trying to preserve a few clippings and seedlings from the previous two books. Maybe they’ll take and maybe they won’t. But until such time as I find the perfect spot to replant them, they’re hanging out in my garden shed in their own little area. This is what I refer to as my “To Root” bin. Here I’ll put bits of writing that spark an idea, emotion, etc. but I don’t know quite where they go, or how they fit in with the novel as a whole. So I set them aside in the greenhouse to grow on their own for a bit, much like putting clippings in water on the kitchen windowsill for a month or two to root. I’ll often go into the greenhouse and pick one of these seedlings as a starting point for my morning writing practice, or if I’m stuck and need some fresh inspiration. Often times the seedlings will grow up and go into different gardens entirely, and that’s fine too.

I also keep a greenhouse notebook, where I jot down interesting ideas that don’t correspond to a particular project yet. Sometimes these will be ideas for future books, or just something I think would be fun to write about. The notes can be anything from a word or two to whole sentences or bits of dialogue that might pop in my mind. Then, generally owing to my own scattered mind, I’ll forget about them for a while, during which time they can germinate and sprout if they have enough energy. If not? Into the compost bin they go.


It might sound naive or idealistic, but because I want my books to be deeply positive things, I believe that writing them should be deeply positive experiences as well. I wish to incorporate nurturing practices in every step of the journey, both for the sake of my books and my own creativity. This doesn’t mean that there won’t be hard work, challenges, and failures along the way, but it means that I can choose to see them as opportunities, rather than disappointments. Whatever my garden grows into, I plan to enjoy it, and to celebrate the journey as much as the end result.


Revising the Garden of the Novel

I have been lost in the wilderness of my current novel (adult literary fiction) for some time now, overwhelmed by the daunting process of revising.  Having not had a formal education in writing, I've been reading every revision guide and piece of authorial advice I can get my hands on.  And it has made me so upset to see so many well-respected writers and editors talk about "fighting," "breaking," and "attacking" their writing when they revise, as if it's some monster to be defeated.  "Kill your darlings" they say, "make the manuscript bleed."  What of the pieces of ourselves and our hearts that live in that manuscript?  Are we expected to put part of ourselves to death every time we have to revise?  And then it hit me, why can't revising instead be a positive process? 

I have a weakness for British gardening shows.  It's no secret that I'll take Monty Don and a quaint cottage garden over a high-stakes drama any day.  So while watching ordinary gardeners turning their unused, weed-ridden gardens into truly delightful spaces, I thought, why can't I do this with my novel?  For me, creativity and creation are deeply positive things.  My end goal, no matter whether it's a painting or a book, is plant the seed of something positive, whether it's hope or joy or gratitude, etc.  So it seems only natural to me that revising and editing (both firmly a part of the creative process) should follow suit, should also be positive.

Of course, if you're overhauling a garden, the first step is usually to clear out the space.  Cut back the dead prose, the passages with no life or energy, that are no longer working for your new vision or your new season of writing.  You must make room for new growth and new ideas.  Yes, this means a lot of hard work, and sure, on the surface it can seem like a violent process: slashing and digging up all the weed-ridden info dumps and dull descriptions, but it is also invigorating.  You're not destroying, you're creating space.  Space for yourself, for your story, for your reader's experience.  You're pruning back scenes to let the action/characters/etc. shine through.  Less is often more in gardening and in writing: you must maximize the space, make full use of the literary form you're utilizing. 

I don't exactly have a green thumb, but I quite enjoy growing roses.  And if you want your rose bushes to keep blooming all season, you must continually trim off the dead blooms; roses thrive on new growth.  And I believe, so do novels.  Both can be beautiful, fragrant gems, but as they say, every rose has its thorns.  Which is to say that the revision process is never an easy or painless one.  My advice: wear thick gloves, don't be afraid of a few cuts, and go in anyway, armed with purpose and determination.  You were brave enough to write a novel, you are brave enough to revise it. 

Books are surprisingly hardy creatures.  Like trees, if they're made of tough enough stuff, they can survive the worst of storms and continue to grow and thrive.  They need room to grow as well as sunlight and water.  In your novel, make space for new perspectives, or for ideas you plant to germinate and grow.  Cram too many ideas together and they'll suffer, fighting with each other for the limited resources of the reader's attention and belief.  I like to imagine working on your plot structure like landscaping a garden, setting a clear narrative path for the reader to wander down and enjoy all that your novel has to offer.  Let them admire your beds of character: filled with all sorts of disparate plantings that come together to create a well-rounded and interesting whole.  Allow them to stop and sniff the lovely aroma of your prose, notice the ingenious layout of your plot, and surprise them with hidden delights every step of the way. 

Finally,  I believe that books and the characters in them take on lives of their own.  As such, you must allow them to grow.  Sometimes this means not hovering over them with spade and pruning sheers every minute of the day, or not fertilizing them until their tender roots start to burn, but simply walking away, and letting them get on with it.  It may take a few seasons, but growth takes time.  Be patient and don't give up.  Soon you will have created a garden that can be carried anywhere and enjoyed by readers the world over.  I believe in you. 

Healing Arts

As many of you know, I've been fighting major illness for a long time, illness which suddenly took a nose-dive this past autumn.  This coincided with my finishing two novels in two months, and meant that I started 2018 physically, mentally, and emotionally exhausted.  So I started painting.

herb_garden.jpg

Nothing big, just little doodly paintings that I'd work on during lunch or in the evenings.  But they sparked something, and I soon found myself painting in every spare moment.   

I went back and forth to the hospital for more and more tests, and at home struggled just to perform normal household tasks, like cooking and getting out of chairs.  It was around this time that I began craving gardens.  I yearned for sunshine, fresh air, and most of all, plants.  Some deep and essential part of me needed to be beneath the trees, to feel soft moss under my feet, and see tender bulbs begin to bloom.  But with my health the way it was, I could no longer just go for a walk or a hike in the mountains, as I used to.  So I decided to bring the outdoors indoors. 

tumblr_p4cx71lr5B1r0xdx0o1_540.jpg

Sitting at my desk with my paintbrush in hand, I began to dream of rambling cottage gardens and allotments filled with vegetables and herbs.  I dreamed of roses climbing over old stone walls and snowdrops peeking out beds of moss deep in the forest.  As we live in a small townhouse, I couldn't have a real garden, but with a little paint and imagination, I could create any garden I dreamed of.  Tiny gardens that would fit in, say, a teacup.  A cup of hope and sunshine, dainty enough to fit in the smallest of spaces.  Being Very Sick, I have a hard time finding hope in great quantities.  But through my little gardens, I've found I can create just enough to fill a teacup.  So for now, I'll take my optimism one cup-full at a time.

tumblr_p4w5u65Yio1r0xdx0o1_540.jpg

Texture

Before I began my master's degree in illustration, I had had no formal training in art.  And while being self-taught does come with certain advantages, I quickly realized how much I didn't know about technique, theory, design, etc.  Even now, I feel like I'm only just beginning to delve into my craft and learn its intricacies.  And what an adventure it is to learn! 

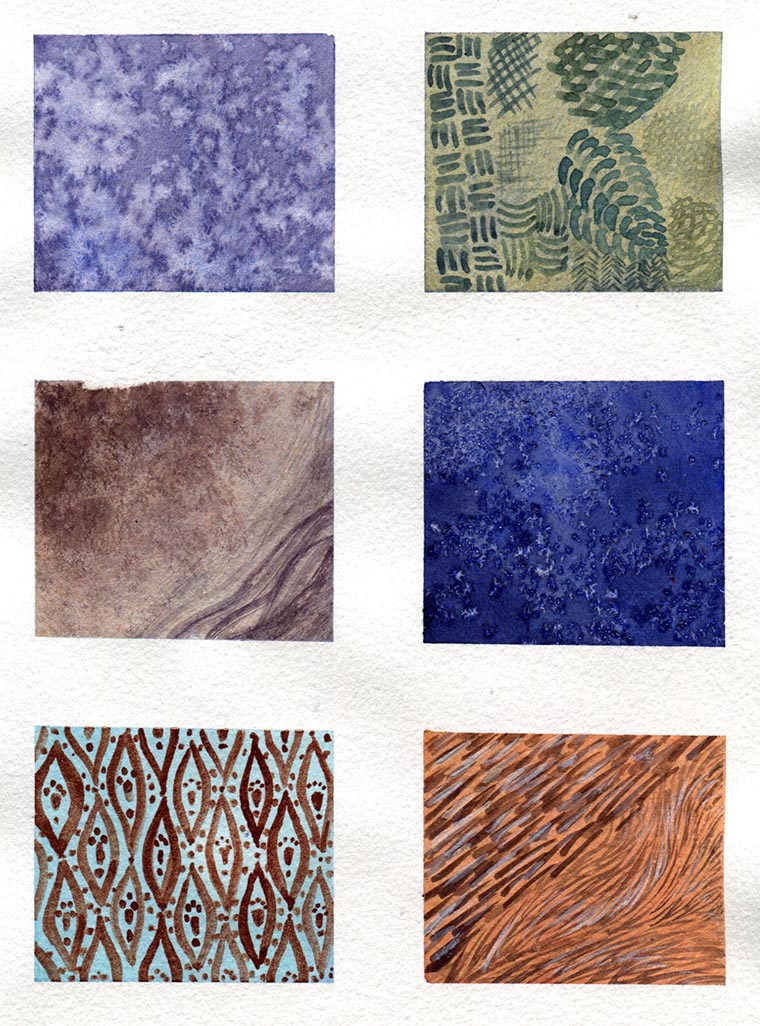
samples

In my first critique sessions in art school, I was overwhelmed by all the terms I didn't know.  Or if I knew them, I had no idea how to execute them in my own work.  Texture?  Tangents?  Golden thing-a-ma-jigs?  In light of that, I thought that I'd start the New Year off with some more practical blog posts about techniques, terms, and simple ways to improve your art.  First up: texture!

Texture

dict

Texture adds richness and depth to your painting, as well as making the surfaces therein feel more tactile and therefore real.  Paintings are like the Velveteen Rabbit, they all yearn to be real.  And no matter the style or subject matter, it's always good to anchor some part of the painting in reality, to give your viewer somewhere to start and something familiar to hold onto. 

So that's all well and good, you say, but how do I put texture in my art?  As I'm primarily a watercolorist, I'll share some of my favorite texturing techniques below.  There are many, many more ways to insert texture into your art (especially if you work digitally or with mixed media), but many of these painting techniques can be applied using your medium of choice.

1. The damp sponge method. 

sample1.jpg

This is exactly what it sounds like: lay down a wash, wait for it to be almost dry (no longer glossy), then dab with a damp sponge (natural sea sponges work best, but in a pinch, a crumpled up paper towel will do) to create cool water spots.  I did a more in-depth tutorial a long time ago which you can still find on my tumblr HERE.

2.  Salt snow.

sample3.jpg

Again, the name says it all.  I've never been a huge fan of this one, since the effects are hard to control (and we all know how much I love control).  Basically, lay down a wash (it works better with darker colors) and while the paint is still wet, sprinkle on salt.  Coarse sea salt works best, but for the above example, I literally just sprinkled some salt from my little penguin salt-shaker onto a wet wash.  Then when it's completely dry, just brush off the salt.

3.  Hatching/Painted texture

sample2.jpg

This is an easy technique to do in any medium to add a bit of texture.  Need to make that basket look like it's actually woven from sticks?  Add some hatch lines in a slightly darker color.  Want that tunic to look like it's made from rough-spun wool?  Hatch lines.  Knit patterns on a sweater?  You guessed it: hatch lines.  Just pick up a small detail brush, and start painting thin lines in one direction, then add some going in a different direction.  Super.  Easy. 

Experiment with line weight and stroke to make your hatching even more expressive.

4.  Dry-brushing

sample4.jpg

It's exactly what it sounds like.  Painting with a dry brush.  This is a bit harder to do with watercolor, as you have to have some moisture either on your brush or in your pigments in order for them to spread.  But a little goes a long way.  Too damp?  Run the brush over a dry paper towel or the back of your hand a few times to dry it off a bit.  The left half of the sample was made by stippling, the right half by doing normal strokes.

(This is how I get most of the texture on my tiny moth wings.  It's great for subtle texturing and small details.)

5. Painted textile designs/patterns

sample5.jpg

Fun fact, I used to work designing commercial fabrics.  It was a pretty interesting gig, and taught me all about repeats as well as historic pattern design, though I'm happy not to be banging my head against my desk trying to make complex tiny repeats work anymore. 

Similar to the cross-hatching, just pick a design and start painting!  For a subtle pattern, make the designs in a color only slightly darker than the base.  Or go for contrast and do something really bold and bright!  I also love painting fabric designs with my iridescent gold from FineTec.  (Which, unfortunately, scan brown.)
Remember, your patterns don't need to be perfect (mine are far from it, for evidence, see above), they just need to break up the monotony of flat-colored surfaces and give them some visual interest.


6.  Layered brush strokes

sample6.jpg

Similar to hatching and dry-brushing this technique is great for painting fur, hair, spines, etc. and making them seem more real.  Remember, paintings are like the Velveteen Rabbit, they want to become real. 

I modeled the left side of this sample after hedgehog spines and first put down a thin wash of burnt sienna for the base, then did a layer of strokes in burnt umber, all going the same direction.  Then when that was dry, I went back with a thinned white gouache and put some more spines on top.  For more complexity, add more layers of in-between shades (or hide some dull blues or violets in there), just be sure that you can still make out distinct spines, so that it hasn't all run together in one blob.

The right side I modeled after fur, and followed the same basic steps as above, just with a thinner brush and short, curving strokes.  Remember that fur moves a lot and frequently changes direction.  Just look at a dog's face and all the different directions the fur there grows.  Then snuggle that dog, because we've reached the end of our tutorial!


If you want more practice, challenge yourself to find and paint six different textures (or more!) around your house or in your backyard.  Maybe there is some really interesting tree bark outside, or a nice pattern knitted into your favorite sweater, or even lichen-mottled rock surfaces.  Remember, inspiration is everywhere! 

If you have any questions or would like to make requests for my next topics, just let me know if the comments below.  Happy painting!

Time

I believe that time is a gift.  Every day that I wake up is a blessing, and one I try not to take for granted.  (Thinking that you're dying does have its advantages.  But don't worry, I'm fine now.)  Time is also a gift I choose to give myself.  Time to work and think creatively.  Time to rest and take care of myself.  Time to steep myself in nature and quiet moments.  Time to just let myself be, and be thankful for all the many blessings in my life. 

As I've been participating in NaNoWriMo this month (though with slightly less-intense rules, since I write and paint full-time already, and it's not just a one-month stint for me), I've been thinking a lot about the time creativity takes.  The great investment of time it demands.  NaNoWriMo has also reaffirmed my belief that no good book is written in a month, but a good rough draft can be.  A rough draft that you can spend the next year or two revising and reworking into something truly beautiful.  Art takes time.  Everyone works at different paces: I know some writers who have spent ten years on one book that's still not finished, and I also know writers who churn out a novel every three months.  There's no right or wrong timeline, so you need to do what's best for you.  Listen to yourself and to your work and give it your all!  Give yourself the time and space to really invest in your craft and give it everything you've got.  What emerges from work undertaken with dedication and with love will always be beautiful.   

angelstar

I can't procrastinate.  Believe me, it sounds like loads of fun and I'd love to try it sometime, but I seem physically incapable of it.  And while this is great for meeting deadlines, it's not so good when it comes to letting projects rest and steep for a while.  The only way I can accomplish this is by working on another project instead, cycling them out so that I always have two or three books on my desk at any given time. 

I think it's important to let large projects (like books) rest for a while in between creative bursts.  The novel I finished for NaNoWriMo (I was about halfway through when I started, and now have a completed rough draft) was one I've been working intensively on for the past six months.  It's a book that I'm deeply passionate about and is quite close to my heart (which are often the hardest ones to write).  As such, I respect it enough to give it a break now.  Let it sleep for a while, during which time I'm free to work on other things, letting my mind operate in different rhythms, think different sorts of thoughts, and let my creativity stretch and flow into different shapes.  And then in a few months, when I'm ready, I'll go back to the novel and start revising and reworking it.  This process will then be repeated for however long it takes to craft the book into the best it can be (since I'll never, ever be satisfied with anything I create).  Or until I desperately need the money from its sale.  That's definitely a large part of the equation as well.  But that's one advantage of having so many books in-progress at once; I can give one time to rest while another is thrown squawking from the nest into the waiting jaws of the publishing industry.

None of us know how much time we have, so it's our job to make the most of it.  This is as true in art as it is in life.  It is our responsibility therefore to invest it in what we are truly passionate about, what gives our lives joy and meaning.  As J. R. R. Tolkien so wisely said "All we have to decide is what to do with the time that is given to us."


Self Care + Kindness

As I hit the final stretch of grueling book revisions (and use them as my excuse for not posting much in the last few months), I'm realizing all over again the importance of self care, especially for those of us in rigorously creative fields. 

I can only speak for myself (since I don't have much experience being anyone else) but I personally find it much harder to be kind to myself than to be kind to others.  Growing up, most of us are taught to be kind, compassionate, and forgiving to others.  But we're not necessarily taught to show ourselves the same mercy.    

It seems preposterous to beleaguer someone, work them to the bone, hold them to impossible standards, and then expect them to produce truly creative and meaningful work.  How then does the argument change when we replace the third party with ourselves?  Somehow we think that if our behavior only affects ourselves, it is justifiable to be a tyrant and a bully.  To abuse and neglect ourselves in the name of productivity and hard work. 

I readily admit that I am long guilty of this offense, of punishing and pushing myself without reprieve, all so that I might feel I'm working harder, driving myself further, ruthlessly expecting perfection at all times, or at least a good showing of blood.

So how do we change this vicious cycle?  How do I change?  However much I may poke and prod at possible answers, don't be fooled, I have no idea either.  Or perhaps I haven't the courage to give up my familiar and brutal ways in favor of something more sustainable, something kinder and gentler.  Or perhaps I'm simply a masochist, so entrenched in my ways that I fear if I change, I will lose my edge.

Let me be clear: I fully support hard work, devotion, and rigorous drive, especially when pursuing one's passion.  But there is a limit.  In all things, there must be a limit.  Otherwise we'll simply drive ourselves mad with work, with a quest for perfection that doesn't exist.  I digress.   

I don't know the big answers about how to change a lifelong relationship of abuse with the self, I don't know how to alter deeply set familial or societal expectations, but I know small ways to be kind to myself.  To relent and to rest.  To call a truce even for a short while.  This is simply my list of nice things I can do for myself, small gestures to remind me that I love and care about myself, reminders to be gentler with myself in the future:

1. Take a hot bath (bonus points for bubbles or good-smelling bath salts/bath bombs).
2. Go for a walk/hike outside.
3. Get up from my desk, stretch a bit, maybe do a crossword or read for a while.
4. Don't work through lunch or eat at my desk.
5. Light candles. Enjoy their warm light and their gentle scent.
6. Wear a dab of nice perfume. Stop to breathe and smell it every now and then.
7. Play with my dog and cat. Extra points for puppy snuggles.
8. Take time to bake. Enjoy the simple meditation of making bread or cutting out pastries.
9. Read a fun, light-hearted book (nothing too dark or serious)
10. Paint/doodle something fun, just because I want to (like moths or silly comics).
11. Listen to happy music, something that makes me want to sing along.
12. Do easy crafts (especially if it involves gluing googly eyes on things).
13. Take a night off. After dinner, don't let myself do any more work for the day.
14. Say "no" more. Don't feel obliged to say "yes" to everything and everyone. It's okay to be selfish sometimes and enjoy a day off/a lighter workload/etc.
15. Go dancing! (even though I'm not very good, I still love dancing tango with my husband).
16. Sew clothes just for myself, but if it gets frustrating, stop and take a break.
17. Remember what I enjoyed doing as a child. Try to do more of that.
18. Take more naps.
19. Go swimming just to enjoy being in the water (as opposed to strenuous laps).
20.  Take a few minutes to stand outside and think of all the things I'm grateful for, and to remember the many blessings that fill my life.  

This week, I challenge you to come up with your own list of 20 (or more) ways to be nice to yourself.  20 small actions that will encourage you to step back and take a moment to breathe, to relax, and to care for yourself.  I believe in you.

painted_moth.jpg

Obsession + Ritual

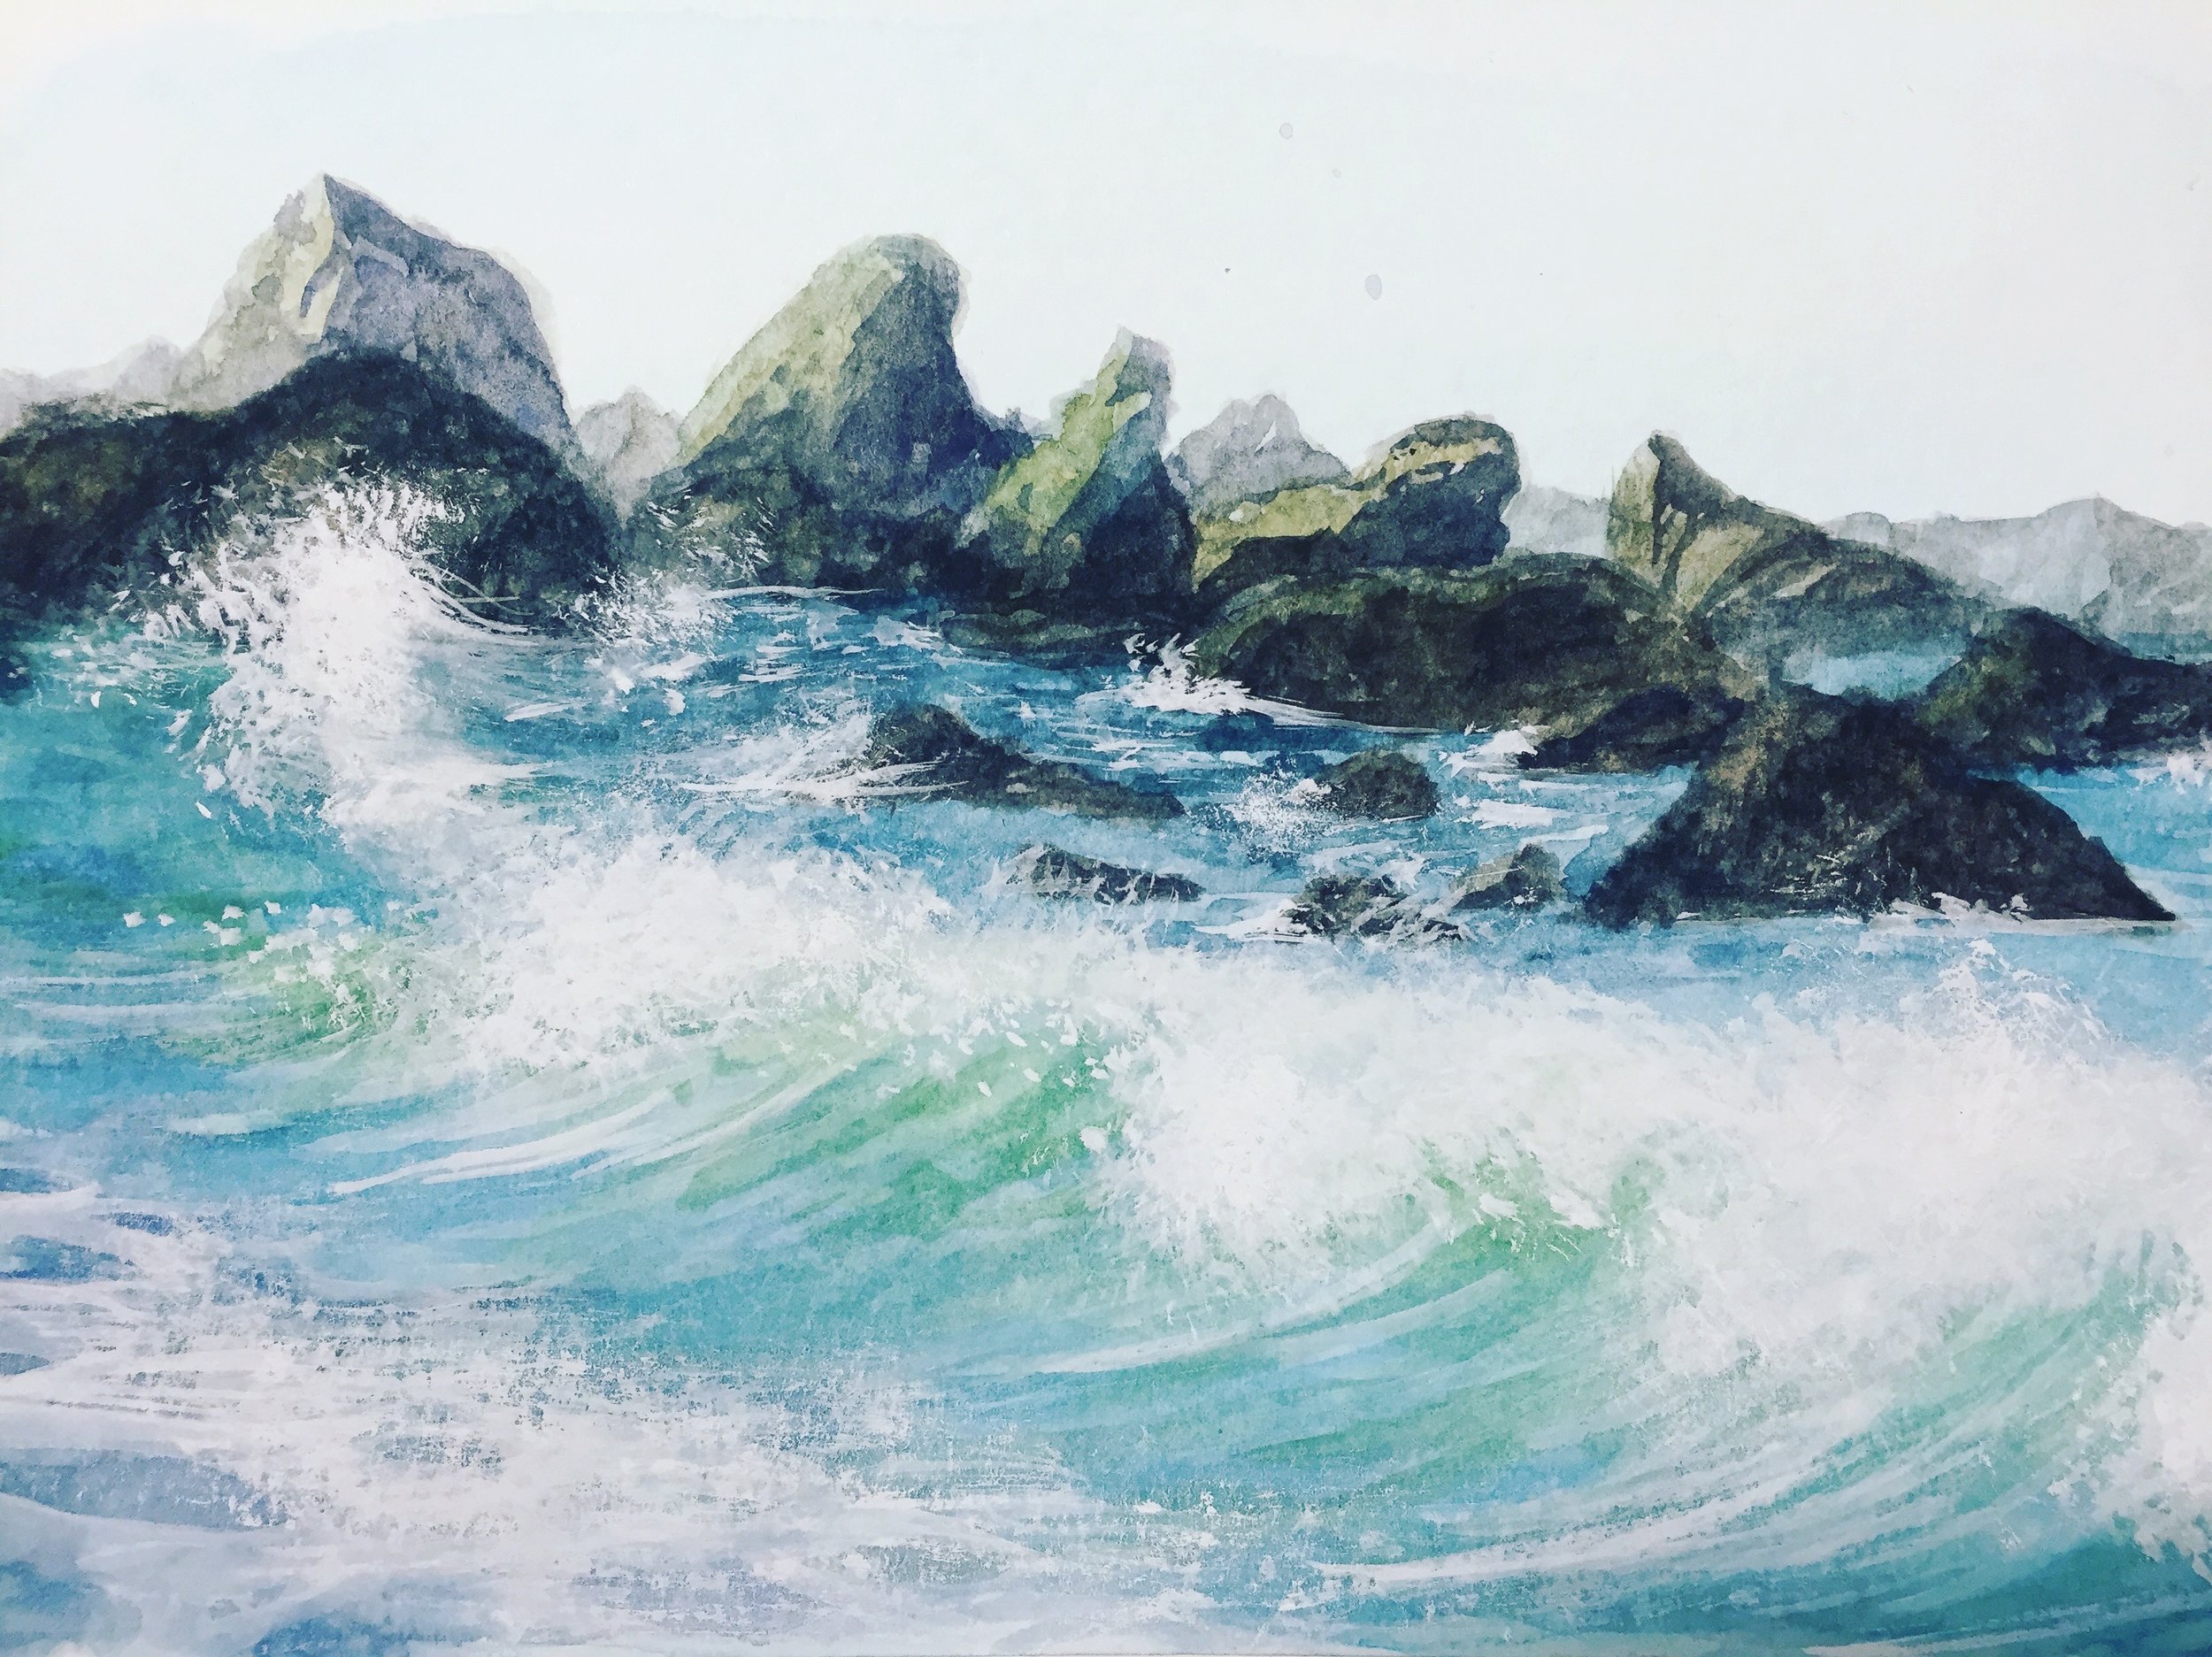
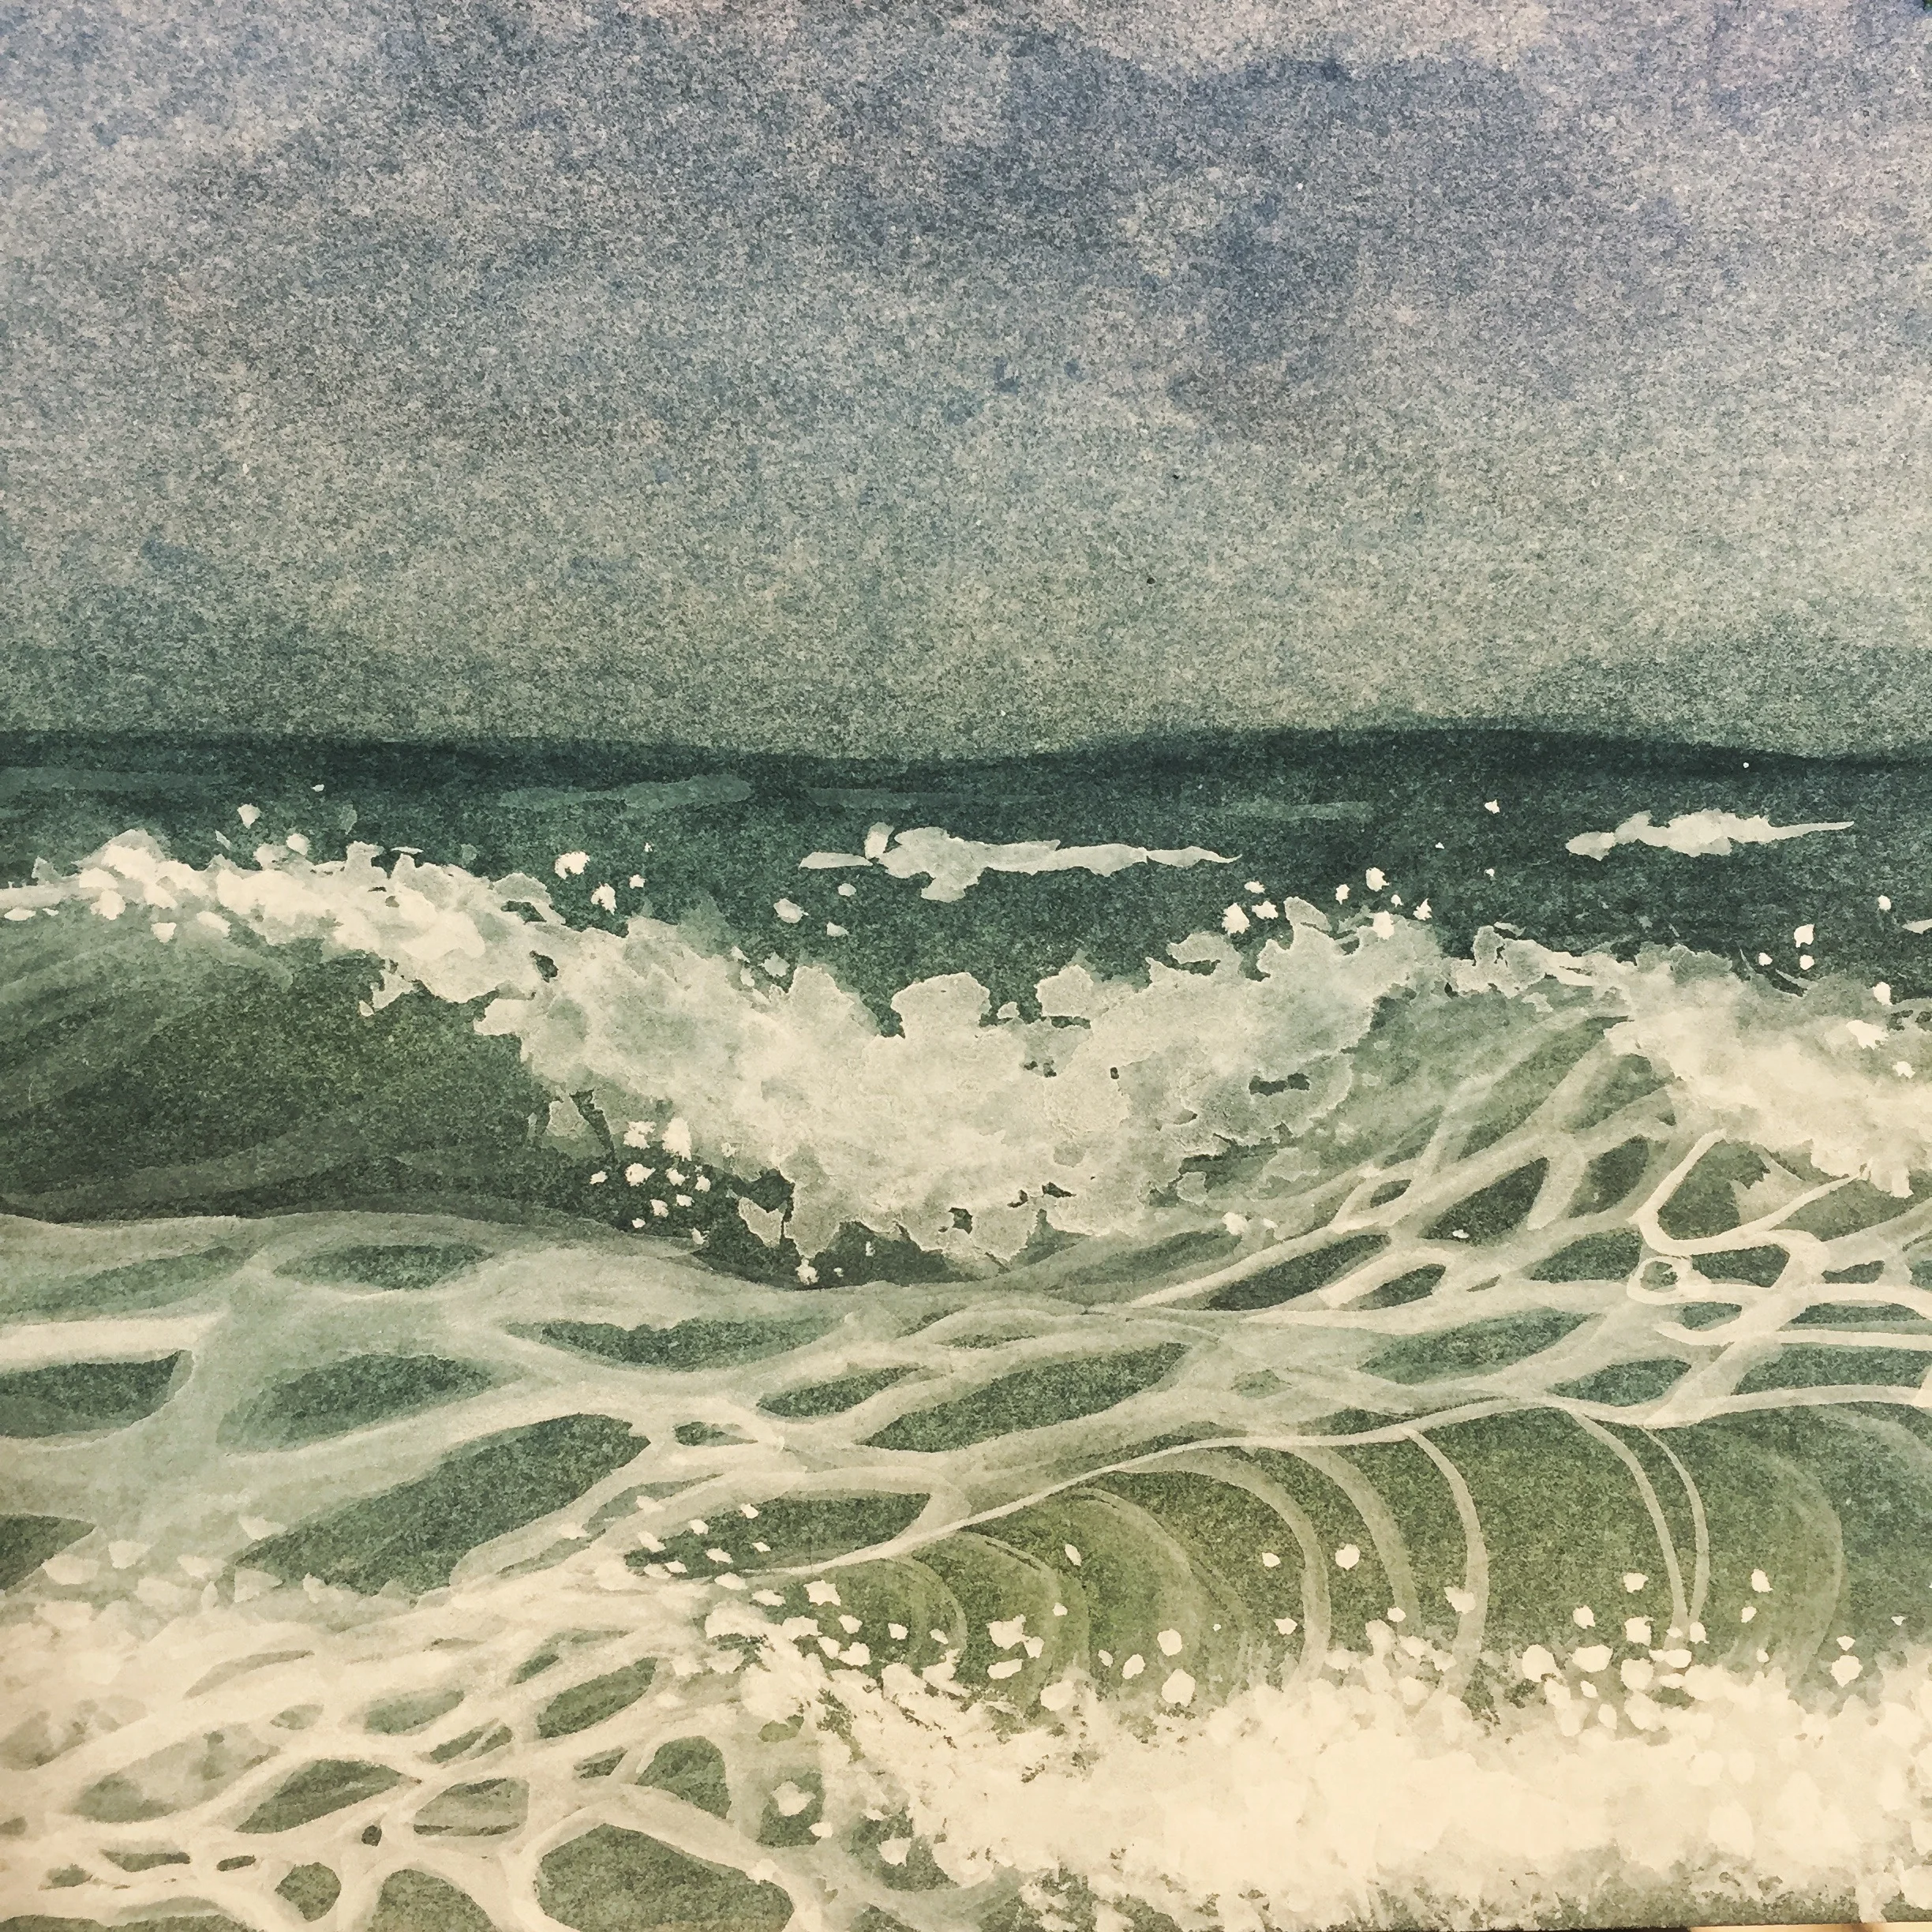
It's no secret that when it comes to painting, I'm obsessed.  Recently, I spent two whole weeks thinking waves, painting studies of waves, reading about waves, and generally trying to get my mind to move in more wave-y ways.  I meditated on the ocean, studied the frothy white lace that rides atop seawater, and did a lot of swimming, imagining I was a big rock with waves crashing against me, or that I was a seal, gliding through a stormy sea.  All this in preparation for one painting for an upcoming book.  I realize I'm more than a little crazy, but for me, this is all just part of my process.  When it comes to painting, I'm all in: putting my heart, mind, and spirit in everything I do.  It's exhausting, sure, but I wouldn't have it any other way.

wavestudy1

I love getting to really dig into a painting.  I love immersing myself in the colors, the detailed brushwork, the way the water interacts with the pigments.  I think my "immersion method" probably stems from a childhood of having very few friends, being bored to tears in school, and so really throwing myself into my art.  It was a refuge, an escape, a world in which I could create anything I wanted.  I learned to comfort myself with color, to distract myself with detail.  

wavestudy2

Recently I've been thinking a lot about my creative process and its rituals.  I've always been fascinated by creative people's rituals: how they get their juices flowing, and how they keep that energy up.

Funnily enough, I feel like I have more structured rituals when it comes to my writing.  When I sit down to write, I'll light a candle (usually something that smells like a winter forest: juniper, spruce, pine, and snow), have a mug of hot tea ready to go, and play classical music (usually Ravel or Debussy).  Sometimes I'll comb through collections of notes or inspirational images relevant to the project (hello, Pinterest!).  Other times, I'll just sit down and start hammering out scenes.   

Painting is much looser (and easier) for me: I put on some sort of interesting music, or maybe a show (I love watching documentaries, especially food-related ones while I work), maybe do some light stretching or take a short walk outside.  Sometimes I'll even wear certain jewelry or perfume to help myself feel more in the creative spirit.

waves

I think these rituals are part Pavlovian cue, part distraction to coax my subconscious or intuitive mind out of hiding.  And as my inspiration is constantly changing, I find that the rituals to unlock said inspiration must change too.  It's a constant journey of exploration, of finding new things that awaken my curiosity and ignite my creative spirit.  Who knows where it will lead next?       

Moths

I paint and write because I have to.  In my mind, there is no other option. 

It's therapeutic in a way, self-indulgent in another.  Creating like this is my passion and my whole life I have been drawn to it, like a moth to flame. 

mothmoon

I began making moths just for myself: for the relaxation and meditative aspects of it.  It's quite soothing, making these little creatures.  I have long admired taxidermy moths and butterflies, but wanted to find a way to preserve their beauty with no creatures being harmed/killed (though I know many mounted specimens are found already dead).  Plus, I thought painting moths would be a good challenge of technical skill (an area in which I continuously need improvement). 

The Penguin Dictionary of Symbols notes the unique dichotomy of moths, that they are symbols both "of the soul seeking the godhead...consumed by a mystical love" and "of faithless frivolity."  Both are represented by the image of the moth fluttering around the candle frame until its wings burn.  In a more personal sense, moths to me are representative of creativity: that I am constantly drawn to the mysterious and divine in it, but that if I'm not careful, I'll burn myself out trying to reach it.  

mothwreath

I've always felt a certain kinship to moths.  We are both most active late at night, when the rest of the world is sleeping.  And though we live in a world of darkness, we seem to expend all our energy seeking out beauty and light.  We're silly, dusty creatures who are continually evolving, even if right now we're just cocoon goo. 

But my moths make me happy.  They are peaceful, contented reminders of creative potential, of metamorphosis, of the beauty found in darkness.     


New Year, New Aesthetics

As many of you know, I got married late last year, and with that came a change of name.  While this has mostly been a matter of paperwork, it also gives me the opportunity to re-brand and redesign my site/cards/etc. (which I think is a healthy thing to do about once a year anyway).  So though I go by K. A. K. Lecky now, the important things won't change.  I will continue to illustrate and to write (I might feature more of the latter on my site this year).  And with any luck, I will also continue to grow and change as an artist.   

This won't be a dramatic change, mind you.  I still illustrate for the same markets and will continue to do so, but I feel my personal aesthetic has shifted a good deal.  After hearing a talk last fall by the brilliant Giuseppe Castellano, art director at Penguin, I feel somehow as if I have permission to make the sort of art I want, even if it's not the cute and colorful sort normally thought of as for children's books.  His main point was to make good art.  That's all.  It can be dark, or strange, or serious; it doesn't matter, as long as it's good art.  That has really stuck with me and in a sense has allowed me to follow my curiosity in ways which are both personally meaningful and challenging for me.


creaturesofthenight

I think as artists, one of the greatest battles we fight is between producing what we feel naturally drawn to create and what we think other people want.  When in reality, it's my belief that people don't know what they want.  So it's really a losing battle from the start.  So this year, I'm challenging myself to say "what is it that I truly want to create?" and "what has meaning for me?" instead of "what will sell?" or "what will be popular?".  Because the latter is built on little more than guesswork.  Only with the former can I hope to communicate something different, something meaningful. 

I'll try to be better with blog posts in 2017; are there any topics you'd particularly like me to cover?  Questions you'd like me to mull over?  Let me know here or send me an email at kakleckyillustration@gmail.com .

Wedding Paper

As many of you know, next week I fly to the Arctic to marry my best friend, love of my life, and fellow illustrator Daniel Lecky.  We'll be traveling to northern Norway and hiking through the Lofoten Islands, which somehow seemed a fitting wedding adventure after getting engaged in the German Alps overlooking Schloss Neuschwanstein. 

To be perfectly frank, I have hated wedding planning.  Planning trips?  Great!  Planning weddings?  Not so much.  But there has been one piece that Daniel and I have really enjoyed working on together: the paper goods! 

Since we're both professional artists, we had a lot of ideas about how we wanted our invitations, save-the-dates, etc. to look, and how we could best collaborate on them. 

savethedate

We designed our save-the-dates pretty soon after getting engaged (well before we knew what sort of style we wanted for the wedding), and so tried to have them really reflect our personalities: kids at heart who love adventuring together outdoors.  We both grew up with Calvin & Hobbes, and love it just as much now as we did then, so it seemed a natural choice of style.  Plus, the comic setup let us tell more of a story, which we really liked.  Daniel did all of the sketching and inking, while I did the painting/color.  It was a fun experiment, trying to copy someone else's watercolor style like that!  Most of all though, we enjoyed getting to work together on a project, which, having such different styles and types of work, is a rare occurrence.

weddinginvite

For our invitations, I wanted to do some kind of papercutting, while still involving Daniel's sleek design sensibilities.  Our original wedding venue was a gorgeously restored 1920s Art Deco building, so as you can see, we drew heavily on that glamorous Deco style for our invites.  And while the venue unfortunately went out of business 5 months before our wedding (giving us some major panic and forcing very hasty replanning!), we still liked the look of the sumptuous fur and classy tuxedo, and decided to use the design anyway, just replacing the background. 

rsvp

And of course, our cat, Arthur, wanted to be included too, so we set him to work guarding the RSVPs.

While I know that a lot of people try to have all their paper goods coordinate in design, we decided just to have fun with it and do a little bit of everything.  Also, since we've both been working our normal jobs throughout the entire process, we only had time for so much.  All in all, we had fun with it and had fun doing it together, which at the end of the day, is what matters most.


I'll post another update soon about my coming name change/rebranding, so stay tuned!  

Seasons + Mixed Media Process

I am a very seasonal person.  I find my creative energies waxing and waning with the growth of the plants, the temperatures outside, and the natural palettes of the earth.  That said, summer is definitely my period of "creative hibernation."  Maybe it's the intense heat and humidity of the Southeastern United States, maybe it's the bugs and sweat, but every year when summer rolls around, I find myself creatively exhausted.  I'm definitely a cold weather person!

Different seasons bring different sorts of inspiration for me.  For instance, I find I do the most writing in fall and early winter, while late winter/spring are good for editing.  Similarly, I seem to be particularly inspired with papercuttings in that period of Indian summer: the tail end of August through the middle of September.  Then I revert back to more traditional watercolors as the trees turn.  These aren't "rules" of mine by any means, simply observations of my own particular artistic rhythms.  Of course, no matter the season, I have to complete my normal work; but isn't it nice when preference and obligation sync up?

Everyone goes through creative slumps or "down-times" now and then (for me, it's easier to call them "down-times" than "blocks" as the latter tends to be quite a frightening word for creatives).  But I think it's important to keep working through them: drawing/painting every day, learning new skills, and sharpening existing techniques.  Because deadlines don't care about how you're feeling. 

These days, I almost always have a mixed media "doodle painting" going on my desk that I work on here and there while other paintings dry or I just need a break.  Unlike oils or other similar mediums that I have to work on in long spurts, mixed media allows me to dabble some now, some later.  Below, I outline my basic mixed media process (which for me involves mostly watercolor and gouache) from start to finish:

1. Sketch

Since I work primarily in watercolors, I sketch quite lightly, then tap the sketch down with a kneaded eraser which accomplishes two things: 1) it lightens the sketch so that it won't show in the finished painting and 2) removes excess graphite so that the paint pigments don't become muddied. 

I sketch like a painter, which is to say minimally and loosely, since all the real work for me comes later (and a lot of details are lost in the first few washes anyway).  This also gives me the freedom to further refine the image as I go.  My one exception is the face: I'll include most of the facial lines/details in my sketch, since a very small change here can drastically alter the image (nose too long, eyes too small/not even, etc.). 

2. Background Washes

There are lots of "rules" for mixed media (what goes down first, how to layer and combine media, etc.).  For the sake of brevity however, I'll stick to explaining just my own process.

With watercolor, lay down your lightest shades first, as well as the areas furthest back in the painting (usually, your background).  Which, I completely disregard here.  That's the funny thing about art: there are all kinds of "rules," but you have to learn the rules in order to break them (I'm a big believer in this, especially when it comes to things like realism, anatomy, and perspective).  Since the selkie will be painted in gouache, I don't have to be so careful about preserving her outlines.  If you want to be really careful, you can apply masking fluid to the figure.  I, however, am not that tidy.  I also like doing a wide background wash, as it helps tone the figure and keep her palette harmonious with the background colors.

The scan below actually shows several washes, adding different colors each time.  Watercolor takes a bit of layering to darken up/make really vivid, so for the edges, I applied several washes of deep ultramarine + burnt umber, with a mix of deep ultramarine + viridian + aqua for the middle.  The great beauty of watercolor, for me, comes from all the colors you can hide in one area.  If you look closely, you can spy tinges of purple, rose madder, and burnt umber in the background. 

I also took the opportunity here to add some texture to the background with a sponge.  This is a very old technique, used by illustrators like Edmund Dulac and Arthur Rackham, but can be quite tricky as it relies on precise dry times (I have a separate tutorial for it here).  I also sponged away the pigment at the focal point of the painting: the selkie's face to help it stand out more. 

3. Base Colors

In doing so many dark background washes, I almost completely lost my sketch (thankfully I had scanned it earlier, so I could refer back to it as needed).  However, I can see the basic shapes, such as the selkie's face and the curve of her tail, which is enough for me to get started.  This is why I never spend too long on the sketch.

Using gouache, I lay down the base colors for the selkie: her skin, sweater, and tail.  Then, I start marking out her face and adding the making the gradient for her hair.

selkie_base.jpg

4. Details

Once the base colors and shadows are painted, I start adding details, such as the cabling on her sweater, strands of her hair, and tail spots.  I also add highlights to her face and hair to help them pop more.


selkie_03.jpg

5. Photoshop Test

If this was a real illustration, instead of just a doodle painting, I would've already planned out the image and colors with thumbnails and color comps.  However, since I didn't do any planning, I decided to scan it and do some test runs of different colors/rock placements in Photoshop.  This allows me to play with endless different options without affecting my painting.  This is an especially helpful tool with watercolor, as there's no going back once you've made a mark on the paper!

selkie_04.jpg

6. Background Details

If you covered the foreground (in this case, the selkie) with masking fluid or knew that you were going to use opaque acrylic gouache for the figure, you could've done this step after completing the background washes.  But again, since I more or less made this up as I went, I finished the background pattern towards the end.  In this case, I added rounded diamond shapes in gradients to represent the flowing Arctic waters.  I also added the rocks with acrylic gouache and painted patterns on them with watered down gouache in a light mint.

7. Finishing Touches

To finish off the painting, I added some white highlights to her hair, and painted ripples in the water with a more watered down white.  Overall the painting still has plenty of problems, but since it's just an un-planned doodle, I'll let it stand as is.  There is a very fine line between putting enough work into a painting and knowing when to stop.  Unfortunately, this is one of those things that is best learned by doing (and messing up plenty!).

And even if I'm not totally satisfied with the painting, I still accomplished my goals with it: to visually think about Arctic selkies and how to represent them and to have fun!

Happy painting!

Stepping up your Sketching + Gouache Process

I love looking at other artists' sketchbooks, whether in person or online, via social media platforms like tumblr or instagram.  Sketches give a unique look into an artist's thought process and method.  While some sketch in pencil, many more take their sketches to the next level with ink+brush, gouache, or charcoal on toned paper (to name but a few).  This change in media may seem small, but it can have a huge impact on your sketches and really take your "silly doodles" to the next level! 

While cultivating a portfolio, the goal is always to make your work look professional (fake it 'til you make it, right?).  And with social media becoming a larger and larger part of marketing and making connections, it's important to carry that professionalism over into the sketches and "rough work" you show too.  Sure, your lines can still be loose and messy, but a simple change of medium can help your doodles really shine. 

Lately I've been doing more gouache sketches.  These quick and simple paintings help me focus more on shape, color, and pattern since I don't use any line work etc.  Below is a step-by-step look at the process I use.  For this painting, I used acrylic gouache, which dries quite quickly, forcing me to work fast and really commit to the colors and shapes I put down. 

dw1

1.  I start off with a wash of aqua for the base.  Some artists prefer to put down their sketch layer first and then seal it in with a very light wash, but since I'm using opaque acrylic gouache, I decided to put the sketch on top of the color once it was dry.  This aqua is actually straight from the tube, which made it easier to clean up edges/stray marks at the end.  While I rarely use color straight from the tube, I take exception when I want a painting to be A) extra colorful/bright or B) fast.

I keep my sketches minimal and very light--blotting them with a kneaded eraser so that they're barely visible.  (This comes from working primarily in watercolor, where you want your sketch to be so faint it's almost invisible.)  Also, if you have too much graphite in your sketch, your paints will pick up its grey pigment.

dw2

2.  Starting with the objects in the very back of the painting, I start to block in the colors.  I decided to have the pineapple be a gradient of yellow to orange/coral so that the light-colored dole whip (the midground) would stand out more.  Since I'm painting yellows/oranges on blue, I had to use a few coats to get the color pure and not so muddy looking. 

dw3

3. Start playing around with patterns/textures for your background object(s).  Remember that it will be easier to experiment now, before you paint the top layers (in this case, the bird).  Then I block in the dole whip with light, buttery yellows, starting to get that swirled look with my brushstrokes.

dw4

4. Add more detail to your midground (dole whip), and then block in the colors of the foreground (bird).  As with the pineapple, since I painted a white bird on a blue background, it took several coats to get the color bright and pure like I wanted. 

I also gave Miss Birdie an eye, because I find it much easier to paint things that "have a soul," so to speak.  People/animals/etc. really come to life once you give them eyes; it's usually at this stage that they'll start telling me who they want to be, their personality shining through with every detail and line. 


dw5

5.  Almost done!  The more I paint Miss Birdie, the more I come to understand who she is, what kind of personality she has.  With each pass, I add more detail to the painting.  Remember that detail, like color, can draw your viewer's eye to a certain spot, so try to focus it wisely.  Here, I use it to point to both the bird's face and the dole whip.


dwf

6.  All finished!  As you can see, I changed my mind a few times before I arrived at the final painting.  Namely, changing the texture on the pineapple and having the birds feathers all separate from the body.  The nice thing about acrylic gouache is that, like regular acrylic, you can simply paint over mistakes and keep going (though the paint builds up rather quickly, giving it a distinct texture, unlike acrylic, whose layers tend to lay smooth). 

Note: This image shows the colors more clearly since it's a scan, rather than a quick phone picture.

So the next time you feel like doodling, try adding color, or sketching in a new medium.  You never know what happy accidents you may find!